setup
In your Hierarchy set your Linkages to the Servo Arm, the Servos Arm to the Servo, Servos to Fuselage Ect....
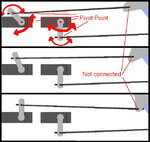
The Pivots Point for the servo Arm you got already. For the Linkages I place the PP where they join to the Servo Arm, With the Linkage hooked to the servo arm in the Hierarchy it will rise and lower when you move the servo arm.
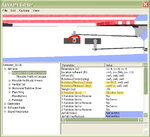
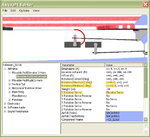
I install a Single Moveable Pod for the servo arm to the fuselage and give it the component frame for my servo arm ( ~CS_ELVAM ) ( just what I name them ). Set up the MP to move on the X axis to what ever servo you need ( this case the Elevator ) ( if x axis moves it on the wrong axis just try the other two ) set the movement to ( example -30 and +30 ) on the right axis. And see if you can get it to move. If it goes the wrong way swap the - and the +
Then install a MP under your the Servo Arm MP, assign it to the Linkage, ( ~CS_ELVLNK ) and again pick the servo to move it in the electronics. Again use the same axis you use above for the servo arm. ( X axis ) Now you need to give it some number that makes the linkages look like it is still touching the control surfaces horn as the servo arm moves, ( the control surface will move just because it is assigned with a servo in the setup ) To make it easy, I hold the control stick all the way in one direction, I select the right set of number that will effect the direction for that stick direction. I select the numbers I need and rotate my mouse wheel to move the linkage back to where it is touching the flight surface horn.
The wire type of linkages with just a bend at one end really look off when it moves. If you make nice big linkage clips, this helps hide the fact that the linkages is not hooked to the flight control horn.
That is how I do it. Other people place the PP on the linkages way below the linkage and in the center. Just need different number to get it to move.
Hope this helps

")