Designing Airports - Tips and Tricks

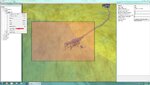
New Liars Field Conifer Depth Buffers Need Work

I think that the depth buffers at the left end of the runway need a bit of work as they do not begin to match the panoramic picture...

Also they are new 6.5 objects and they do not operate like any other depth buffers and are hard to work with as they cannot be displayed.
 
I think that the depth buffers at the left end of the runway need a bit of work as they do not begin to match the panoramic picture...

Also they are new 6.5 objects and they do not operate like any other depth buffers and are hard to work with as they cannot be displayed.

Are you referring to how close the tree line is in relation to the end of the runway? Those trees could stand to be pushed back a couple hundred yards.
 
Yes, that is easy enough to do... and so I went to do it, but the conifer object used is defective and cannot be made observable in the airport preview picture ... ahem cough weez "environment editor."

Are you referring to how close the tree line is in relation to the end of the runway? Those trees could stand to be pushed back a couple hundred yards.
 
Night Photofield.

So you want to do a night photo field?? remember to set the sun inclination to less than zero. A value of -60 gives a bit of twilight. Of Course, you do need a panoramic picture shot at those lighting conditions.
 
Last edited:
Having Trouble adding Depth Buffers/ Collision Objects?

Depth Buffers and Collision Objects are the same thing. Ever wonder how the simulator knows to crash when it runs into an object in the panoramic picture. It is because the designer created a depth buffer (new designation) that is invisible but is solid when you crash into it.

It is discussed further in this thread: https://forums.realflight.com/showpost.php?p=244897&postcount=20

Making a folder to contain all your depth buffers allows each item in the folder to inherit the folders setting whether to display in orange or invisible. A neat trick is to drag and drop the pano picture. That way you can keep the pano window small and still see the area you are working on. When you are done, the overhead view in the editor should resemble the overhead view of the area shown in the pano. Sometimes the overhead shot helps you place the object quickly.
 
How to create a folder

Right-Click on the folder you want to put a Folder in, and scelect Add Folder {Pic. 1}. Give the Folder a name (you can change it later), or see the properties window (these affect the objects inside) {Pic. 2}. With the folder scelected you can add objects in it, or drag object's into the folder {Pic. 3}. In picture 4 I have made the object 'Invisible'.
 

Attachments

  • folder1.jpg
    folder1.jpg
    162.4 KB · Views: 33
  • folder2.jpg
    folder2.jpg
    169.2 KB · Views: 33
  • folder3.jpg
    folder3.jpg
    225.3 KB · Views: 42
  • folder4.jpg
    folder4.jpg
    245.2 KB · Views: 32
How do I create a curved depth buffer?

http://photosynth.net/view.aspx?cid=116866db-5841-43bf-a75b-2e7639da75d0&m=false&i=0:0:0&c=0:0:0&z=486.948440582829&d=-1.21739940863074:-1.21983228756421:-1.20415918262731&p=0:0&t=False

See the above pano on Photosynth. I've got a dome with curved walls and ceiling. Any suggestions on how to do the depth buffers for this so it doesn't feel like a cube?

Too bad we can't also simulate the temperature in there. It was -2 outside and about 25 inside making it tough on the thumbs! At least there is no wind!

To make the walls feel like they are at the right distance, this was taken with a 50 mm lens, with 36 pictures @ 10 degrees each per rotation and a total of 256 shots. This was done with the homemade pano head from the link on this site, handheld shots for the zenith, top row, nadir and bottom row. The camera on the tripod was about 5 feet off the turf. It was stitched with Microsoft ICE. Not perfect, but good enough. I scaled it down to 8192x4096 for RF6.

Expansion pack #2 has a similar field called E-Fest, I'm sure it could be done. I had or have a field just like yours somewhere? Could be on a back-up disk.
 

Attachments

  • ScreenShot1292550453.jpg
    ScreenShot1292550453.jpg
    285.9 KB · Views: 12
Creating an Arch Collision Object

I would try long walls stacked on top of one another and tilt them to form the arch. Just to try something... I created a large cylinder, rotated it 90 degrees and put half of it below ground. The spawn point was inside the cylinder. I found that I could fly through the cylinder wall and get out, but could not fly back. I got a minor disruption as I flew out of the cylinder.

I looked at the field mentioned above they have four armory roof scenery objects created to form the roof line perimeter of the building. The objects do not appear to be of use to your project and I don't know about the EP issues of reusing those and giving the field away.

Or you could ask and see if one of the modelers here would create an arch depth buffer airport object for you... you could enter the radius and length to generate your dome...

See the above pano on Photosynth. I've got a dome with curved walls and ceiling. Any suggestions on how to do the depth buffers for this so it doesn't feel like a cube?
 
Last edited:
Adding Helicopter Landing Targets to a Flying Field.

Radd's School of Rotary Flight talks about playing Helicopter Baseball.
I am going to tell you how to modify any field in the Real Flight simulator to add bases on the runway to use for "Baseball" practice.

Adding Red Dots to any flying field in Real Flight.

1) click on the 'Environment' menu item, select 'Edit xyz .... field" item to edit the airport.
2) When the Airport Editor opens select 'Objects' in the 'Folder Listing' window at the top left.
3) In the 'Object Pallet" form at the top right expand (by clicking on the plus sign in front of) 'Real Flight 6.5' (your version number may be different)
4) Scroll down in the 'Object Pallet' form until you see the 'Events' item node. Click on the plus sign to expand the selection.
5) scroll down until you see the 'Red Dot' object. double click on the object to add it to the airport.
6) you will see the object on the airport background overview which is a collection of all the objects. The red dot object will be highlighted. Move the dot where you want it placed.
7) you can click and drag on the picture inside the 'Pilot Spawn' form to find the object in the view. You can select objects in the top left form... by clicking on a pilot spawn you can find where the pilot is located and the click and move the Red Dot near the pilot.
8) I add like to add four objects, one for each baseball base, and move them in relationship to one another.
9) I like to change the size of the dot to 200% or 300% of the original size in the 'Properties' form at the lower left, the size used is left up to you.
10) I like to make the helicopter spawn point have the same coordinates as home plate.
11) when complete, I exit from the airport editor... and always Save the changes...
12) If you are making changes to a Real Flight standard airport, you will have to change the name a bit so it will save. You cannot save changes to the original...

Finally exit to Real Flight and enjoy the targets

You can also put tables and other objects on the airport to fly around.
 

Attachments

  • ScreenShot1363271110.jpg
    ScreenShot1363271110.jpg
    350.3 KB · Views: 22
Last edited:
Perhaps the single biggest mistake in making photo fields is getting the horizon placed in the proper location. Too high or too low and the end user flying experiance will not feel right.

You have to experiment with the top and bottom of the photo... add (best) or remove part of the picture to get the horizon as close to the middle of the picture as possible.

The horizon is easy in an outdoor photo field... inside a bit more difficult. When I shoot an indoor field, I try to make a mental note of things that are exactly the same height at the camera lense (nodal point). Then I use those points as the horizon line. It takes 5 or 6 around the room to get it right.

I also try to take the panorama as close to pilot eye height as possible depending on the tripod (they get shaky) that I am using.
 
Perhaps the single biggest mistake in making photo fields is getting the horizon placed in the proper location. Too high or too low and the end user flying experiance will not feel right.

Yup, some of the other sims ( cough * Phoenix * Clearview * cough ) do a TERRIBLE job at this. Even the default "professionally done" airfields in those sims are a joke in that respect.

Worst still the creator didn't bother double checking Pano "distance" from the viewer...

Getting the Pano lined up and sized properly takes a lot of trial and error, but is key to getting a good Pano Airfield in the sim.
 
My current thinking is that the camera should be elevated to be as close to an average person's eye level as possible. 5'-6" or so... then get the pano placed with the horizon as close to mid point in height as possible. Seems to take a bit of the guessing out of things. I hate that trial and error part, but it is non-the-less. You just have to edit the pano.

I have done two fields that I am rather proud of and shot many more.
 
I still do a lot of panoramas that never get turned into photo fields, but I sure like how nice everything turns out with a good panorama.
 
HUGIN Software vs. RF7

I completed the pano of my field with much success. I used the free version of PTGUI and got great results in RF7, of course I have the water marks. The horizon came out right, and the view of the aircraft at each end of the field is accurate. I tried to stitch the same pictures together in Hugin, (no watermarks) the pano is washed out in color, and the end result when placed in RF7 is the P-51 looks like a park flyer as it heads towards the end of the runway. Does anyone know what is going on?
 
Thanks OP

Do you do any work with Hugin? I used PTGUI and had no problem with creating the field in RF7. It just has the watermarks. I use 10000 x 5000 and other 2 to 1 ratios for both programs. Is there someone out there that might be able to run my pano through the paid version of PTGUI?
 
Why not just remove tthe watermark i have the trial version but forget or rather never checked its EULA did you give up your copyright to the photographs by mearly running them through thier Lprogram...? Watermarks are to prevent copying matirial by twarting a clean repoduction FOR FINANCIAL GAIN And to protect the authers copyright +f source matirial
 
Back
Top