Here are some things we would like everyone to know about VR. They are grouped into two different sections based on whether they apply specifically to performance or to the overall experience.
VR Experience
Resolution
The current virtual reality headsets provide roughly half as many pixels as a standard widescreen monitor. VR is not about a high resolution presentation. The hardware isn't there yet. Instead, it's about the experience.
Even if the aircraft doesn't look quite as good as it does on your monitor, it's far more immersive to look around the world freely, tracking your model just like you would at the field. VR lets you do things like glance between your model and the runway when lining up for a landing. If you get away from yourself and lose orientation, no longer can you rely on the movement of the camera as a clue; you really need to fly your way out of it. A simulation should feel as close to the real thing as possible. VR adds a new level of realism that has nothing to do with adding pixels.
PhotoFields and VR
PhotoFields do work in VR, but you won’t get the full experience. Because the panorama used to create the PhotoField is monoscopic (2D), the entire simulation has to be rendered that way. This means that you don’t get the 3D effect that lets you judge distance, etc. in VR. This might make the aircraft’s scale seem strange, and it might make it harder to focus on the aircraft against the background.
The 2D panorama also means that you can’t move your head around. Your look direction is tracked, but your position has to be locked.
We know that many users swear by the PhotoFields, so we kept them working in VR. Just bear in mind their limitations.
3D Airports and VR
3D airports (all airports except PhotoFields) allow the full VR experience. In these flying sites, the terrain and all objects are rendered in full stereoscopic 3D. You can even walk around if your physical VR space is big enough. All camera modes are enabled at 3D fields.
Camera Modes and VR
For extra fun, try the different camera modes. Models with cockpits are particularly rewarding. Scaling is applied to cockpit cameras to make the aircraft feel bigger - your head wouldn’t fit inside many model canopies! In general, the cockpit VR experience will feel like flying a full-scale aircraft.
Some users may experience VR-sickness with flying camera modes. This is a hazard with any application that moves the camera around, not just RealFlight.
VR Performance
Framerate is Important!
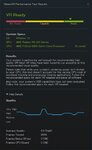
Maintaining 90 frames per second (FPS) is critical for a good experience in VR. The system automatically locks the framerate to 90 fps. If it can’t sustain that, it drops all the way to 45 fps (and even further to 22.5 if needed). At framerates below 90 fps you can expect to see some doubling of the image and generally have a subpar experience. Therefore, it is important to check your framerate and adjust settings as needed to achieve 90 fps.
Checking Your Framerate
First, make sure you are running version 8.00.019. Then simply turn on the NavGuides gadget within RealFlight and look at the “Graphics Frames/Sec” readout. Note that some airports and aircraft are more demanding than others. You may find your framerate varies depending on what you are doing and where.
Improving Your Framerate
Improve your framerate by adjusting RealFlight’s graphics quality settings. The simplest way to do this is to select Simulation->Graphics… from the main menu and choose a lower setting. For finer control, select Simulation->Settings… from the main menu, navigate to the Graphics->Quality settings group, then tweak individual settings. (Note that changes to some settings do not take effect until the sim is restarted. See each setting’s description for more info.)
You should do whatever it takes to achieve 90 fps in VR, even if it means lowering quality settings beyond what you might otherwise find acceptable for regular sim usage. Some of these settings aren’t very noticeable in VR and won’t be missed. For example, normal maps add a lot of value on a standard monitor, but provide almost no benefit within VR. Turn them off for an easy and painless gain.
“VR Quality” Setting
Within a separate Virtual Reality settings group in the Simulation->Settings dialog you will find a “VR Quality” setting. Its name makes it a tempting target when trying to enhance your VR experience, but use it only as a last resort! Lowering that setting will have more of a negative impact on the visual quality than anything you might change in the Graphics->Quality group.
That is because the VR Quality setting alters the resolution of the entire image being presented to each of your eyes, which is then scaled up or down to match the physical resolution of your headset’s screens. If you lower it, everything is rendered at a smaller size and then stretched to fit (think of it like zooming in), which creates ugly artifacts.
We strongly recommend keeping this setting on High unless you have a compelling reason to change it. On High, visuals are rendered at exactly the right size for the hardware, meaning no scaling occurs.
When Should I Adjust the VR Quality Setting?
If you are using VR, make sure Vertical Sync is disabled in RealFlight. This setting is located in the Graphics->Hardware group.
Support
If you need additional help with RealFlight 8, please contact Product Support.
VR Experience
Resolution
The current virtual reality headsets provide roughly half as many pixels as a standard widescreen monitor. VR is not about a high resolution presentation. The hardware isn't there yet. Instead, it's about the experience.
Even if the aircraft doesn't look quite as good as it does on your monitor, it's far more immersive to look around the world freely, tracking your model just like you would at the field. VR lets you do things like glance between your model and the runway when lining up for a landing. If you get away from yourself and lose orientation, no longer can you rely on the movement of the camera as a clue; you really need to fly your way out of it. A simulation should feel as close to the real thing as possible. VR adds a new level of realism that has nothing to do with adding pixels.
PhotoFields and VR
PhotoFields do work in VR, but you won’t get the full experience. Because the panorama used to create the PhotoField is monoscopic (2D), the entire simulation has to be rendered that way. This means that you don’t get the 3D effect that lets you judge distance, etc. in VR. This might make the aircraft’s scale seem strange, and it might make it harder to focus on the aircraft against the background.
The 2D panorama also means that you can’t move your head around. Your look direction is tracked, but your position has to be locked.
We know that many users swear by the PhotoFields, so we kept them working in VR. Just bear in mind their limitations.
3D Airports and VR
3D airports (all airports except PhotoFields) allow the full VR experience. In these flying sites, the terrain and all objects are rendered in full stereoscopic 3D. You can even walk around if your physical VR space is big enough. All camera modes are enabled at 3D fields.
Camera Modes and VR
For extra fun, try the different camera modes. Models with cockpits are particularly rewarding. Scaling is applied to cockpit cameras to make the aircraft feel bigger - your head wouldn’t fit inside many model canopies! In general, the cockpit VR experience will feel like flying a full-scale aircraft.
Some users may experience VR-sickness with flying camera modes. This is a hazard with any application that moves the camera around, not just RealFlight.
VR Performance
Framerate is Important!
Maintaining 90 frames per second (FPS) is critical for a good experience in VR. The system automatically locks the framerate to 90 fps. If it can’t sustain that, it drops all the way to 45 fps (and even further to 22.5 if needed). At framerates below 90 fps you can expect to see some doubling of the image and generally have a subpar experience. Therefore, it is important to check your framerate and adjust settings as needed to achieve 90 fps.
Checking Your Framerate
First, make sure you are running version 8.00.019. Then simply turn on the NavGuides gadget within RealFlight and look at the “Graphics Frames/Sec” readout. Note that some airports and aircraft are more demanding than others. You may find your framerate varies depending on what you are doing and where.
Improving Your Framerate
Improve your framerate by adjusting RealFlight’s graphics quality settings. The simplest way to do this is to select Simulation->Graphics… from the main menu and choose a lower setting. For finer control, select Simulation->Settings… from the main menu, navigate to the Graphics->Quality settings group, then tweak individual settings. (Note that changes to some settings do not take effect until the sim is restarted. See each setting’s description for more info.)
You should do whatever it takes to achieve 90 fps in VR, even if it means lowering quality settings beyond what you might otherwise find acceptable for regular sim usage. Some of these settings aren’t very noticeable in VR and won’t be missed. For example, normal maps add a lot of value on a standard monitor, but provide almost no benefit within VR. Turn them off for an easy and painless gain.
“VR Quality” Setting
Within a separate Virtual Reality settings group in the Simulation->Settings dialog you will find a “VR Quality” setting. Its name makes it a tempting target when trying to enhance your VR experience, but use it only as a last resort! Lowering that setting will have more of a negative impact on the visual quality than anything you might change in the Graphics->Quality group.
That is because the VR Quality setting alters the resolution of the entire image being presented to each of your eyes, which is then scaled up or down to match the physical resolution of your headset’s screens. If you lower it, everything is rendered at a smaller size and then stretched to fit (think of it like zooming in), which creates ugly artifacts.
We strongly recommend keeping this setting on High unless you have a compelling reason to change it. On High, visuals are rendered at exactly the right size for the hardware, meaning no scaling occurs.
When Should I Adjust the VR Quality Setting?
- Your graphics card is at the very low end of what is supported and struggles to sustain a desirable framerate even after reducing standard graphics quality settings as described above. Lowering this setting just might give you the last little boost you need to experience VR.
- Your powerful system easily maintains 90 fps everywhere you fly even with all the graphics quality settings cranked up, and you are looking for ways to further improve the visuals. Increasing this setting will result in supersampling of the entire image for each eye, which can add a small amount of antialiasing. Be sure to verify that you still see 90 fps with it raised.
If you are using VR, make sure Vertical Sync is disabled in RealFlight. This setting is located in the Graphics->Hardware group.
Support
If you need additional help with RealFlight 8, please contact Product Support.
Last edited:
")