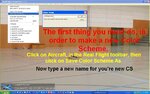
How to make alternate maps, n and s tga's

helohero

New member
I have been trying for a while to learn how to make these maps (when the CS does not have one to begin with) but everything I have been told does not seem to work. I have got to be doing something wrong. Is there anybody out there willing to take the time to help explain this for those of us that do not know how?

I am using Corel Paint Shop Pro X2 Is this capable of doing the mods to the normal map?
 
Last edited:
For this thread to help the most people, we have to start at the begining. You can not paint a new tga unless you have a new tga.
 

Attachments

  • ScreenShot047.jpg
    ScreenShot047.jpg
    96.4 KB · Views: 115
  • ScreenShot048.jpg
    ScreenShot048.jpg
    82.3 KB · Views: 95
  • ScreenShot049.jpg
    ScreenShot049.jpg
    96.5 KB · Views: 99
  • ScreenShot050.jpg
    ScreenShot050.jpg
    94.6 KB · Views: 95
Last edited:
Well, a broad range of questions, so lets go with the basics:
Again, this is review for most, but newbs will benefit from the basics.

It all starts with creating an alternate colorscheme:
*Pic 1: Save Color Scheme As...
*Pic 2: Give it a friendly name, click OK.
*Pic 3: Pay Attention to what the Simulator is telling you, Also it will tell you where it is.
*Pic 4: Navigate to the folder where the colorschemes are stored. There you will find a .TGA that holds that friendly name you just gave it.

**Note: Not all custom models/stock/expansion/add-ons will have a normal and or specular map. (red messages pic3)
So what to do now? Use the basic .TGA RGB file as your template to build your normal or specular map.
All the Normal Map and Specular Map information is taken from the mapped areas that you see in the Basic .TGA RGB file.

Once you have made your edits to your normal or specular map, save each as _n.TGA (Normals Map) or _s.TGA (Specular Map)

*Pic 5: Select your newly edited colorsceme in the Menu.


You say you have Corel Paintshop Pro, I don't use that, but google search says it may be possible, you're on your own with that package.
http://developer.valvesoftware.com/wiki/Normal_Map_Creation_in_Photoshop_or_Paint_Shop_Pro
 

Attachments

  • CS1.jpg
    CS1.jpg
    77 KB · Views: 36
  • CS_2.jpg
    CS_2.jpg
    37.6 KB · Views: 36
  • CS_3.jpg
    CS_3.jpg
    127.2 KB · Views: 40
  • CS_4.JPG
    CS_4.JPG
    56.9 KB · Views: 39
  • CS_5.jpg
    CS_5.jpg
    103 KB · Views: 38
The early bird, eats and leaves before the hunters show up.
 

Attachments

  • ScreenShot051.jpg
    ScreenShot051.jpg
    109.9 KB · Views: 69
The Specular Map

Yes, it shows there is more than one way to skin a cat.
Also, now we know how the G3.5 Cavemen do it. :D
Unfortunately G3.5/G4 cannot perform the following colorscheme tweaks.

Moving on to the next steps:

Since you already made a Colorscheme for Wingman's SU-26, we'll be using it as an example (Sorry Wingie, hope you don't mind.)

Personal Taste:
Unless an Aircraft calls for a military colorscheme, I am not a big fan of Flat shaded Paintjobs.
All things in the realworld have some level of Gloss and Specular highlights.
And I prefer for this specific colorscheme, to be flashy and glossy.
By default import, this model is Flat shaded, let's improve on that.

I don't use your paint package, so I will be using an old faithful Photoshop Elements. Other packages are very similar.
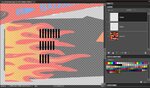
*Pic 6: First, open the .TGA texture with your paint editor, This will be the template for the map you're making.

Now, examine how the aircraft is mapped:
This Aircraft has all the main surfaces mapped, but the wheels, canopy glass, and a few other engine components are baked-in.
**Remember, you can only paint the portions of the aircraft that are mapped to the colorscheme.

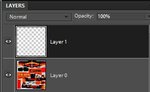
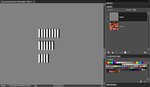
*Pic 7: Set a new layer atop of your template. We'll use it for the overall gloss baseline.
How glossy? Well, what looks good to your eye?
I like to start any modifications at neutral 50% grey, then adjust everything from there.
Since the entire colorscheme for this is the aircraft skin, it's easy.
Paint the whole thing grey.
Exceptions are if:
--The aircraft tires are mapped, then obviously rubber is not glossy, mask that out and shade it flat(Black)
--If the canopy glass is mapped, then glass is probably the most glossy piece on this model. Mask that out and make it very glossy (white)

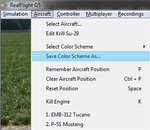
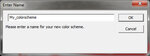
Now that you painted the map grey, save it with _s.TGA suffix.
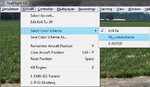
Re-load your colorscheme and see your results, adjust to personal taste.
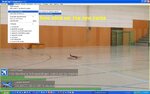
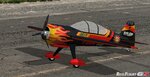
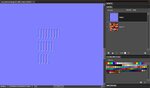
*Pic 8: Before (As imported, Flat-shaded)
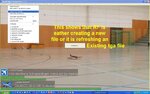
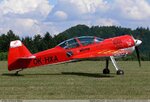
*Pic 9: After (After creating _s.TGA specular map)
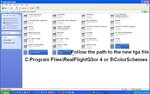
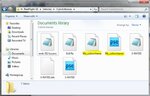
*Pic 10: You Colorscemes directory should now indicate the presense of your .TGA, anhd _s.TGA including the .dds files.

To be continued.... Normal Maps are next.
 

Attachments

  • CS_6.jpg
    CS_6.jpg
    65.3 KB · Views: 53
  • CS_7.JPG
    CS_7.JPG
    16 KB · Views: 78
  • ScreenShot1278802856.jpg
    ScreenShot1278802856.jpg
    210.9 KB · Views: 74
  • ScreenShot1278802884.jpg
    ScreenShot1278802884.jpg
    208.6 KB · Views: 79
  • CS_10.JPG
    CS_10.JPG
    17.9 KB · Views: 43
Last edited:
Normals Map

Another cool little trick that's been around since G4.5, and it's easier than you think, as long as you have a plug-in for your Paint Application.

GIMP, Photoshop Elements, Photoshop have a plug-in, other packages might.

Why would someone want to do a Normal Map?
You can add details to a model that otherwise don't exist in the original.
Details like dents, scratches, panel lines, rivets, screws, wrinkled monokote, etc...
Just like a regular colorscheme, as long as the pieces are mapped, you can paint in your detail.

Continuing with Wingman's model.

*Pic11: A standout detail in a Sukhoi are those cowl vent louver things. On a real life R/C model, these are molded into the fiberglass cowl.
So lets do those for this example.
*Pic12: Once again open your .TGA file, we'll use that as the template (I set this to 50% opacity, so that I can see clearly what I'm doing)
- Add Two layers on top of your texture.
- Take your brush and add some rows of black lines where the cowl vents will be. (I named this layer Depth)
*Pic13:- Now choose the top layer and add some white lines, adjacent to the black lines.
- These will serve as the raised vent louvers. (I named this layer Height)
- We're done for this example, so now we'll add our baseline height color. I inserted a layer between our template and the depth/height layers.
- The Grey color you choose here depends on how much of an effect you want. And as I am a 50% gray kind of guy, that is always my starting point.
We can't see our template anymore, so make sure this is your last step.
*Pic14: Time for the Normals plugin. Merge your Baseline, height and depth layers together and pick your normals pluging from the Filter menu.
* Pic15: In the plug-ins menu, all I ever had to modify were
- Average RGB (we don't use the ALPHA channel)
- Alpha Field Unchanged
- Scale (exagerate or lessen the effect)

5 pic limit... next post.
 

Attachments

  • CS_11.jpg
    CS_11.jpg
    270.8 KB · Views: 62
  • CS_12.JPG
    CS_12.JPG
    131.1 KB · Views: 65
  • CS_13.JPG
    CS_13.JPG
    59.5 KB · Views: 70
  • CS_14.JPG
    CS_14.JPG
    52.7 KB · Views: 60
  • CS_15.JPG
    CS_15.JPG
    55.3 KB · Views: 74
*Pic 16: The resulting output of the Normap Map Plug-ins filter should look like this.
- Save this with the _n.TGA suffix.
- Re-load your colorscheme.
*Pic 17: The result as seen by Realflight.
*Pic 18: Your Colorschemes folder should now have a complete set of .TGA, _s.TGA and _n.TGA along with their .dds friends.

Now expand on this, add panel lines, rivets, etc...

In the Normal Map world, Black carves, White raises.

If you want shallow panel lines and taller rivets, then darken your baseline depth color. Or change the scale in the plugin.

There is no wrong or right way to do things, experimentation is highly recommended.
SEARCH engines are the best source of knowledge on all subjects, try every single tutorial you run across.

I highly recommend this site: http://www.simmerspaintshop.com/

Good Luck...
Frank.
 

Attachments

  • CS_16.JPG
    CS_16.JPG
    53.6 KB · Views: 50
  • ScreenShot1278813687.jpg
    ScreenShot1278813687.jpg
    179 KB · Views: 78
  • CS_18.JPG
    CS_18.JPG
    29.4 KB · Views: 23
helohero said:
I have tried _N.TGA, _n.tga, _n it will only save when I get rid of the . then it makes a new dds? I hate to clutter up this thread but I NEED HELP. Again I am doing this in the sim is this wrong?
yes thats wrong
just so you're clear....
you don't "Save As" the normals maps in the sim to create the normals maps
the only thing you do in the sim is create the "classic" .tga from which you will create the CS and normals files in your paint program
only after doing the things mentioned above with the "classic" .tga
will you "save as" the "classic" .tga in your paint program as a _n.tga or a _s.tga to create the normals maps :D

Also I think it is Important to note that if you choose to make a new CS from Aircraft that already has one or both of the normals maps (no you don't HAVE to have both and some aircraft don't)
they also will be generated automatically when you "Save As" the new CS in the sim
usually in that situation you dont have to do any thing to the _n.tga unless you want to add something like wrinkles in the mono coat , dents , etc.
But you WILL NEED to alter or create a new _s.tga (again only IF it had one previously)
to reflect (no pun intended) the changes you've made........other wise you will see what looks like "Ghost Images" from the original CS superimposed under your new one when viewed in the sim
 
Last edited:
Thanks Phrank, Maj. Numbskully and Flexible. Phrank and flexibles walk through made everything really easy and Maj. explanation cleared up some other info I have received in the past about auto generating the N and S map (only if the CS has them to begin with) This alone was driving me nuts.

This is my first s.tga, n.tga. The s.tga has lighter coloring on the stripes and window and dark everywhere else. I copied the red lines off the design a few times and decreased the size for the n.tga. I also edited the .colorscheme file(use notepad to open this) as stated in Phranks "More Bling to your Colorschemes" thread. This was just a test but I think it turned out ok. See the before and after below. :D

Thanks again for all the time and effort to clear things up for us. I could not find this info anywhere, probably looking in the wrong places.
This was greatly appreciated.

**Make sure you have your graphics turned up and the normals map on in your settings menu in the sim or these effects will not work**
 

Attachments

  • screenshot1278552219_5dv.jpg
    screenshot1278552219_5dv.jpg
    157.2 KB · Views: 57
  • ScreenShot1278908156.jpg
    ScreenShot1278908156.jpg
    157.4 KB · Views: 62
Last edited:
Back
Top