Current Version: 0.99
For those interested in creating RF models using Blender, you are painfully aware of the issues with the current 3DS export files. The python export script contained several issues, primarily the node structure was not exported as part of the 3DS file. I have been working to fix these problems and have a functional script ready for public testing.
The attached zip contains an updated blender 3DS export script. Unzip the file export_3ds2kex.py into the blender scripts directory (C:\Program Files\Blender Foundation\Blender\.blender\scripts). This is the same directory that will contain the original 3ds_export.py file.
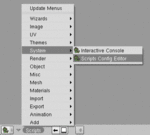
Once the file is copied, next step is to open blender. It will automatically add a new export option under File->Export, "3D Studio 4KEX".
I'll cover a few points in this thread:
1. Naming
2. Parenting
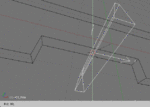
3. Pivot points
The end goal of this project is to completely eliminate the need for post-processing and to simply use the Knife Edge tool 3DS2KEX. i.e. No using 3D Studio, no use of Deep Exploration either.
Naming convention
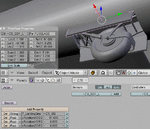
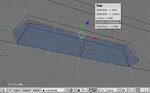
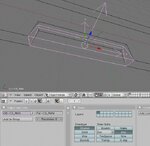
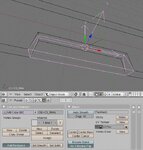
The naming convention exported to 3DS and into the KEX file comes from the object names and UV texture name. Whatever name you give the object "Fuselage", "~CS_RMW", "~CS_RMA", etc are the ones you will see in the RF aircraft editor. Simply name your object what you would like to see in RF. This is done on the Object panel (F7) in the Buttons window. For example, "OB: ~CS_RMW"
The colour scheme name comes from the UV texture name. This is set on the UV/Image Editor window. When you texture map the model, open the TGA image on the UV/Image Editor window and the default name will be "YourFilename.TGA". Rename this to whatever you want the colour scheme to be called on import.
Updated Nov 7/07: Script updated to v0.94 with a lot of help from maxkop and his DG-800A model! Some highlights:
- Can now completely create aircraft model in Blender!
- Just run 3ds2kex to complete the process
- Rotations now work correctly for multiple levels of hierarchy
- Fixed material naming with UV textures
- Will only export UV textures (not the blender 'game engine' texture)
- Material reflectivity exported (e.g. Lambert shader)
- Material specularity exported (e.g. CookTor shader)
- Material alpha exported (aka Opacity for easy canopies)
- Note: Texture filenames must be less than or equal to 12 characters long (e.g. "12345678.tif") and must be in the same directory as the exported 3DS file for 3ds2kex to find the texture file
Once again thanks to maxkop for all the assitance and being the guinea-pig to iron out all the bugs in the script!! Look for his DG-800A soon!
Update Nov 12/07: New version 0.96 includes automatic creation of custom SUP file and is able to call 3DS2KEX utility for 1-click KEX file creation!
- Can include NUP_ parameters such as "NUP_LandingGear" and "NUP_MaxRotationXDEG", etc.
- Refer to page 2 of thread for screenshots and explanation
- Pending work on NUP parameters for lighting effects and smoothing. Might not be possible since 3DS2KEX does not appear to support these features (only in the 3ds max plugin...)
- NOTE renamed script so if you have the old version please delete the file '3ds_export_4kex.py' from blender script directory
Update Nov 12/07: Version 0.97 includes ability for alternate pivot objects.
Update Dec 16/07: Not a version update, just changed the attachment format. Script is attached as both .TXT file (place in Blender scripts directory and rename from .TXT to .PY). Also attached ZIP file with .G3X extension to avoid the forum's "corrupt archive" problem. Rename the .G3X file to .ZIP and extract the script.
Update Jan 20/08: Version 0.98. Lots of improvements:
1. Will detect ~CS_GLOBALOPTIONS object and will automatically copy any parameters of this object to all other objects
2. Objects can override the ~CS_GLOBALOPTIONS parameter with their own value
3. Objects can override their 'IsPivot', 'Pivot', 'Parent' and even 'Name' values in the SUP file by using a parameter
4. See the 3ds2kex output in the console window for blender, which uses the "-s -v3" command-line parameters to call 3ds2kex
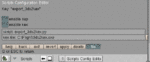
5. Once you run the script once you will have a new option in the SCRIPTS CONFIGURATION editor which lets you turn on BETA 3ds2kex.exe features. This will include the "STRING:" "BOOL:" "FLOAT:" qualifiers in the SUP file.
6. Parent name: It will first use the value from the blender object hierarchy, next will use the CS_GLOBALOPTIONS Parent property (should never use this!!), finally will take the value from the object's Parent property
Update Dec 16/08: Version 0.99 updated with proper encoding. No longer throw error with latest version of blender.
For those interested in creating RF models using Blender, you are painfully aware of the issues with the current 3DS export files. The python export script contained several issues, primarily the node structure was not exported as part of the 3DS file. I have been working to fix these problems and have a functional script ready for public testing.
The attached zip contains an updated blender 3DS export script. Unzip the file export_3ds2kex.py into the blender scripts directory (C:\Program Files\Blender Foundation\Blender\.blender\scripts). This is the same directory that will contain the original 3ds_export.py file.
Once the file is copied, next step is to open blender. It will automatically add a new export option under File->Export, "3D Studio 4KEX".
I'll cover a few points in this thread:
1. Naming
2. Parenting
3. Pivot points
The end goal of this project is to completely eliminate the need for post-processing and to simply use the Knife Edge tool 3DS2KEX. i.e. No using 3D Studio, no use of Deep Exploration either.
Naming convention
The naming convention exported to 3DS and into the KEX file comes from the object names and UV texture name. Whatever name you give the object "Fuselage", "~CS_RMW", "~CS_RMA", etc are the ones you will see in the RF aircraft editor. Simply name your object what you would like to see in RF. This is done on the Object panel (F7) in the Buttons window. For example, "OB: ~CS_RMW"
The colour scheme name comes from the UV texture name. This is set on the UV/Image Editor window. When you texture map the model, open the TGA image on the UV/Image Editor window and the default name will be "YourFilename.TGA". Rename this to whatever you want the colour scheme to be called on import.
Updated Nov 7/07: Script updated to v0.94 with a lot of help from maxkop and his DG-800A model! Some highlights:
- Can now completely create aircraft model in Blender!
- Just run 3ds2kex to complete the process
- Rotations now work correctly for multiple levels of hierarchy
- Fixed material naming with UV textures
- Will only export UV textures (not the blender 'game engine' texture)
- Material reflectivity exported (e.g. Lambert shader)
- Material specularity exported (e.g. CookTor shader)
- Material alpha exported (aka Opacity for easy canopies)
- Note: Texture filenames must be less than or equal to 12 characters long (e.g. "12345678.tif") and must be in the same directory as the exported 3DS file for 3ds2kex to find the texture file
Once again thanks to maxkop for all the assitance and being the guinea-pig to iron out all the bugs in the script!! Look for his DG-800A soon!
Update Nov 12/07: New version 0.96 includes automatic creation of custom SUP file and is able to call 3DS2KEX utility for 1-click KEX file creation!
- Can include NUP_ parameters such as "NUP_LandingGear" and "NUP_MaxRotationXDEG", etc.
- Refer to page 2 of thread for screenshots and explanation
- Pending work on NUP parameters for lighting effects and smoothing. Might not be possible since 3DS2KEX does not appear to support these features (only in the 3ds max plugin...)
- NOTE renamed script so if you have the old version please delete the file '3ds_export_4kex.py' from blender script directory
Update Nov 12/07: Version 0.97 includes ability for alternate pivot objects.
Update Dec 16/07: Not a version update, just changed the attachment format. Script is attached as both .TXT file (place in Blender scripts directory and rename from .TXT to .PY). Also attached ZIP file with .G3X extension to avoid the forum's "corrupt archive" problem. Rename the .G3X file to .ZIP and extract the script.
Update Jan 20/08: Version 0.98. Lots of improvements:
1. Will detect ~CS_GLOBALOPTIONS object and will automatically copy any parameters of this object to all other objects
2. Objects can override the ~CS_GLOBALOPTIONS parameter with their own value
3. Objects can override their 'IsPivot', 'Pivot', 'Parent' and even 'Name' values in the SUP file by using a parameter
4. See the 3ds2kex output in the console window for blender, which uses the "-s -v3" command-line parameters to call 3ds2kex
5. Once you run the script once you will have a new option in the SCRIPTS CONFIGURATION editor which lets you turn on BETA 3ds2kex.exe features. This will include the "STRING:" "BOOL:" "FLOAT:" qualifiers in the SUP file.
6. Parent name: It will first use the value from the blender object hierarchy, next will use the CS_GLOBALOPTIONS Parent property (should never use this!!), finally will take the value from the object's Parent property
Update Dec 16/08: Version 0.99 updated with proper encoding. No longer throw error with latest version of blender.
Attachments
Last edited:
")