Blank CS Canvas

PilotRick6546

New member
Hey everyone, im new to this whole game.. I've become pretty good at it, and i made my first mod and color-scheme last week. I was wondering if there was anywhere i can get a blank color-scheme of each plane, or any for that matter. Or maybe some tips on how to blank them all out in gimp 2.0. Any help would be greatly appreciated. Thanks,
PilotRick
 
yes, but what im taling about is with all color removed, so i can start fresh, without have to like remove all the color myself
 
Do as opjose said.
Then edit that new .TGA
Create a new layer, paint it all white.
Save it.

There, a blank canvas.

Now you don't know where each part of the aircraft is mapped-to. :eek:
 
If it's a stock aircraft, then no. We've heard KE does not supply those.

If it's a custom model from the Swaps, ask the author if he'll share their texture map.
 
I have a few tricks I use in PhotoShop to essentially start with a blank canvas...But, with the parts outlined as a reference...Not sure if they work in gimp, can you manage multiple layers of a CS you are working on?

Griff
twoeleven
 
If you cant get ahold of a UV snapshot of a plane .tga then the best way is to create seperate layers of each of the pieces.

now after you have done this for each of the desired pieces in a .tga when you want to paint over the process is as follows:
1) you hold control key and left click on the layer of the piece you want to paint over. this creates a marquee selection around the edges so you can only create inside the selected area.
2) before doing any painting over your new selection you need to create a new layer above the previous layer. the reason for this is if you need to go back then you can easily make a quick selection without having to reselect around the edges using magic wand or lasso tool.
3) try this technique out and if you have a question or dont understand something give me a holler and i can guide you through it.

also i should mention that this example is based on someone who is using adobe photoshop CS3 or newer.
 

Attachments

  • likethis.JPG
    likethis.JPG
    164.7 KB · Views: 34
phrank said:
If it's a stock aircraft, then no. We've heard KE does not supply those.

Let me rephrase this...

What is exported, is what you get.

Now if you have some paint program skills and the original scheme/model creator went the extra mile, you are in luck. You can use the paint program to give you a similiar end result.

Often exported schemes from already painted craft, have the non-used areas in a different color.

Open the exported scheme in a good paint program.

Duplicate the existing layer and render the original layer invisible.

You can select by color-range or with the magic wand / lasso ( or a combination there off ) to select the non-used area, which is usually all one color.

INVERT the selection, and hit DELETE.

Voila! you have all your "parts" laid out ready for your new paint scheme.

If prior to doing the latter, you DESELECT non-scheme related detail ( such as cockpit, wheels, etc. ) you retain the original artists work on those parts.

If I were working from AFG's image above, I would have first duplicated the base layer, turned off the original layer, on the new working layer I selecte the white unused area with a magic wand... then INVERT the selection and hit DELETE.

That's it, instant parts layout.
 
Last edited:
twoeleven said:
I have a few tricks I use in PhotoShop to essentially start with a blank canvas...But, with the parts outlined as a reference...Not sure if they work in gimp, can you manage multiple layers of a CS you are working on?

Griff
twoeleven


Could you tell me the tricks you use in photoshop because I'm trying to do this in photoshop, but having a tough time.
 
busspuppy said:
Could you tell me the tricks you use in photoshop because I'm trying to do this in photoshop, but having a tough time.


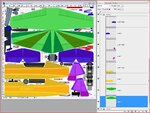
Okay, follow the instructions below along with the attachment to this post. The pictures are in order, pic 1 will be the top left pic, and pic 6 will be the bottom right.

Step 1. "Save color scheme as _______________"
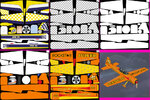
Step 2. Open that named .tga in PS, if it is an easy one it will look like pic 1.
Step 3. Duplicate that layer, hide the original background for now and select the new layer.
Step 4. Using magic wand, select all of the black, or solid color frame surrounding the parts on the original CS in your new layer, what you are selecting looks like pic 2. Now "select inverse" and hit delete. You should see pic 2.
Step 5. Unhide the background and it should LOOK like pic 1 because you can see through the holes you just created in the new layer. Now, the original background layer should be locked, and this new layer (more of a stencil) should stay your top layer.
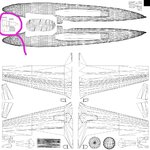
Step 6. Add new layers between the background and the stencil, work from the base color up to the decals, which go on last. I usually add an entire layer of just white, pic 3. which I will make see-through, make opaque, make hidden periodically as I work. Everything else I do either gets layered over the white, or I will cut out the white to let the original cockpit or wheels or engine come through.
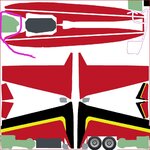
Step 7. Add more, check in RF after each major step to check for alignment, pic 4.
Step 8. Add the graphics and the eye candy, call it a wrap. Pic 5
Step 9. Upload to the world your finished profduct. Pic 6

Good luck,

Griff
twoeleven
 

Attachments

  • HowtoCS.jpg
    HowtoCS.jpg
    425 KB · Views: 10
I always make a .psd copy first
and work on that
that way you can preserve all of your layers
in case you need to go back and fix/change anything.....(trust me ...sooner or later you will)
when you are done making changes
Copy/paste("copy merged" in photo shop) them from the .psd TO the .tga
(dont forget to merge the .tga before closing it)
and
be SURE to save the psd "As Layers" (or in a NON-merged state)

It's totally a matter of prefrance
but most of us do not make a "blank canvas"
when making CSs (just paste over the stock image)....
but if you like a blank canvas thats fine. :D
 
Last edited:
Hmmm, yes, I always save a .psd as I go, ever since the "Golden Hawks" incident, which I don't want to talk about. BUT, my PS automatically saves the .tga flat. So, I am working in .psd making periodic saves, and saving as a targa at each step. Saves me having to flatten and unflatten as I go.

Good point Numby!

Griff
twoeleven
 
PilotRick6546 said:
lol, sorry, forgot to leave that out, is there any way to like leave the outlines of the parts?
like this?
as Phrank said...... only if the designer will provide them.
 

Attachments

  • colored1a.jpg
    colored1a.jpg
    109 KB · Views: 4
  • coloring_book1a.jpg
    coloring_book1a.jpg
    250.9 KB · Views: 4
well .....actually there is a way to leave the PANEL outlines(in photoshop)
As shown by "crashed again" with out getting the orig. files

I used to make CS s for IL-2 (actually in IL-2 they are called “paint schemes”)
Where getting a hold of the original files was as impossibility
So I figured out a way to preserve the panel lines(on a sep. layer) on SOME of it’s planes
Thankfully since those files are sometimes supplied by the generous designers we have around here there’s no need to……. it saves A LOT of work...(thanks guys :D )


I Guess /Think I could do the same on some of the stock RF aircraft that we don’t have file access to
but I so far have not done so (or even tried)
 
Last edited:
Back
Top