abaser
Well-known member
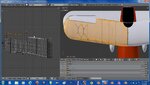
This is the type of thing Im dealing with. Every part has one or more of these areas. Now, if you have 30+ parts, stacked on top of each other upon combining, well, you get the idea. Ive found that if your part has too much of an angle, it will split it just like this.
Asking for a solution on Blenders forums rendered no answers. So, if I can't fix it, Im gone.
At Boof, well, we'll see what happens. Im going back to familiar territory to finish this one up.
Asking for a solution on Blenders forums rendered no answers. So, if I can't fix it, Im gone.
At Boof, well, we'll see what happens. Im going back to familiar territory to finish this one up.