Poor Man's Bump Map

phrank

Well-known member
I promised pplace a simple example on how to make bump mapping work for those who have Normals Maps enabled.

The great thing is, KE made it real easy to add all the new fancy features to legacy models.
What you need to know is, we now have to deal with 3 .TGA files:
The familiar color map: yourplane.tga
The normals map: yourplane_n.tga
The specular map: yourplane_s.tga

If you imported your bird into G4.5, the .colorscheme file already has some entries in there that you need, all you need to do is supply the normals and specular map Bitmap files.

***Google some of this stuff if you don't understand

Normals Map:
In the real world a modeler will take a high-poly model and project that fine detail into a low poly model. But as most of us have already modeled a low-poly version, some may not want to go to all the trouble of re-creating their babies in higher poly version.
No problem, you can fake a normals map by drawing panel lines, ribbits, or surface texture over your existing colorscheme and use Photoshop's or Gimp's Enboss to give your lines some depth and faux 3D.

Specular Map:
This one defines how shiny or flat your model's reflection will be. The intensity of that reflection is controlled by the Grey level that you paint into the _s.TGA file.

Now for the Example:
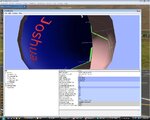
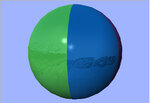
I took an old Beach Ball project, and imported it into G4.5. It was already painted now we need two more things to make it better in G4.5:
* Normals Map
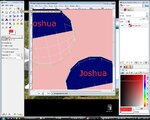
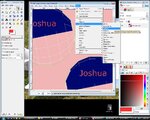
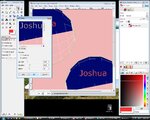
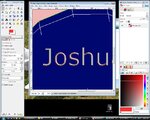
I used the G4.5 Logo and overlayed it into the model's map. I then used the Photoshop to emboss that logo, and copied it for each section of the Beach Ball.
I also applied a noise filter to every other ball segment, this was to give the ball an alternating smooth and rough segment.
I then saved the normals map the same name as the Painted map above, only with the _n.tga suffix.
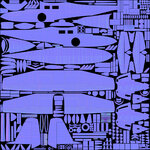
* Specular Map
Nothing fancy here, I just de-saturated the painted ball texture, and saved it as a _s.tga suffix.

I'm not saying this is the correct way to do a map, but it's a means to an end, experiment a lot to get the results you need.
The proper way is the long way, do the high-poly version and use that to project the normals into the Realflight version.

I hope that helped.

Good Luck,
Frank...
 

Attachments

  • Bump_Ball.jpg
    Bump_Ball.jpg
    49.7 KB · Views: 90
  • Beach Ball_EA.RFX
    929.5 KB · Views: 13
There are some questions left. The texture TGA is a true color 32bit format with an 8bit alpha channel. So is the same format used for the bump and specular map? If not: which format is needed? A bump map or a specular map would need only one 8bit channel, so using a 32bit TGA would be quite a waste of resources.

Also the question remains, if RF really supports normal mapping or only bump mapping. There is a big difference, as bump maps ("height maps") only store a height information (one 8bit channel), while normal maps store a normal vector (three 8bit channels).
 
Just to help clarify also: You don't have to use all 3 types of .tga files do you?

Obviously the legacy cs .tga you need (like always) but does a _n.tga work without a _s.tga, or do they work in tandem kinda? (I assume you can do one without the other, but I'd like to clarify my thinking)
 
Until KE comes out with with their official guide, here are some half-truths: :)

pplace:
It seems that you do not need all of them, I notice the Slinger has a _s.tga but no _n.tga.

0x and others:
"I tried it and it worked" seems to be a common mantra for self-taught folks who don't do this for a living.
Is it always the right way? Of course not, there is always a better way, but we refine our methods as we become more experienced.
Not knowing should never be an obstacle to picking up new tricks.

;) I do have a sense that you already have your answers, please do share with the rest of the class. :)

Great news is, there is a lot information out there, accesible to anyone with access to Search Bar.
 
Nice guide phrank. I want to answer some of the questions that were brought up here:

Specular Map:
This one defines how shiny or flat your model's reflection will be. The intensity of that reflection is controlled by the Grey level that you paint into the _s.TGA file.
To clarify:
The specular map's RGB channels control the specular intensity on each color channel. The A (alpha) channel controls the shininess. Together they both control the per-pixel environment map reflection.

is the same format used for the bump and specular map?
Yes, they both require the same tga format.

Also the question remains, if RF really supports normal mapping or only bump mapping. There is a big difference, as bump maps ("height maps") only store a height information (one 8bit channel), while normal maps store a normal vector (three 8bit channels).
RF requires the normal map to be in XYZ format (three 8-bit channels: RGB respectively).

Just to help clarify also: You don't have to use all 3 types of .tga files do you?
No, you don't.
 
THought I would post some screenies of this process for GIMP users. This is VERY basic as I too am just learning this technique so have at it.

I made a simple ball like frank with a simple left/right uv map. AFTER I applied a little color I added my name to make the "bumpy" part. I used the similar color selector to select my name on both parts (screenshot 1). The next screenshot shows where to find the emboss filter followed by the dialogue box. I guess its just play around rule ATM as I'm not sure what will give the best results. The next screenshot shows the result and the last shows it in RF. I assume you could use this for selecting all your rivets prior to weathering. A more advanced look at what everything does can be found here:
http://www.linuxtopia.org/online_books/graphics_tools/gimp_advanced_guide/gimp_guide_node74.html
 

Attachments

  • s1.jpg
    s1.jpg
    165.9 KB · Views: 26
  • s2.jpg
    s2.jpg
    189.3 KB · Views: 19
  • s3.jpg
    s3.jpg
    167.5 KB · Views: 21
  • s4.jpg
    s4.jpg
    164.2 KB · Views: 21
  • s5.jpg
    s5.jpg
    141 KB · Views: 35
Thanks to those who are taking their time to try and help out the other members of the community in figuring out how to best make use of some of these new features of RealFlight!

Just to add a bit to what Japhet wrote and give you guys a few links to check out...

------

For those who would like to attempt the "high poly model onto low poly model projection" method of generating a normal map, there are a number of freely available utilities:

NVIDIA Melody
ATI Normal Mapper

Those among you who are using 3D Studio MAX to do your modeling can also use the facilities built into that program for texture baking to generate your normal maps.
Ben Mathis has a tutorial up for how to do this on his site (albeit for an older version of 3dsmax, version 7)--you can find that tutorial here.

------

For those who would prefer to paint their normal maps in 2D (which carries with it a lot less overhead, especially for retrofitting older models), there are also a few options:

NVIDIA provides a free set of Photoshop plugins, including one that can turn a monochrome height map (bump map) into a 3-channel normal map, the format used by RealFlight. You can find that here.

A more versatile program called CrazyBump is also available; however, it is not free. There is a demo available, though.
 
I bake my normal maps with blender...and there is no need of a high poly model to create the normal map if you know how to work with the render engine...

Greets,

Max
 
Last edited:
maxkop said:
I bake my normal maps with blender...and there is no need of a high poly model to create the normal map if you know how to work with the render engine...

Greets,

Max

What's the proper temp to "bake" them at!haha :p
 
The terminus "bake" I used comes from the method of "texture baking" which means a process of rendering (normally three dimensional) information to a two dimensional texture file. There are multiple ways of making use of this technique. One of them is generating normal maps out of high poly models. But that means you have to model your bumpness on your high poly model in order to be able to render it to the normal map texture.

I use this feature to create dirt maps, amient occulsion maps and since G4.5 normal maps and perhaps soon also spec maps. The render engine of blender gives me the possiblity of adding multiple texture files (bump map templates with different parts of my texture file) and for each of them I can adjust the way they affect the normals of my normal map and how they are mixed up in the final "baked" normal map. Than I only have to click on "BAKE" and blender renders my normal map directly as .tga - file. The advantage of this way is, that I don't have to create a high poly model and I'm getting a clean tangential normal map.

But depending which map I'm baking my CPU run's on 70 °C for about an hour ;)

Greets,

Max
 

Attachments

  • G-44_n.jpg
    G-44_n.jpg
    335.2 KB · Views: 37
  • ScreenShot1224796271.jpg
    ScreenShot1224796271.jpg
    314.9 KB · Views: 42
Last edited:
Japhet said:
To clarify:
The specular map's RGB channels control the specular intensity on each color channel. The A (alpha) channel controls the shininess. Together they both control the per-pixel environment map reflection.

I get it now, I didn't think to look at the ALPHA channel.
The old way we used to adjust the Glossiness and Specular sliders to achieve the desired material look, often requiring multiple material edits.
This new way, the RGB and ALPHA channels act in a similar manner, we now have individual material properties control over each Mapped portion of our models.
I'm finding that if you do include a specular map, this map overrides the settings done in the 3D editor.

This now allows us to have metallic, painted, plastic type of looks just by painting in the mapped portions, all without having to remake a model with different material properties. Very Cool.

This bird for instance, is now able to either get metallic paint legs, or the standard stock plastic bits. With nothing more than changing the Colorscheme. Nice!

Any colorscheme artist can have so much creative power within their grasp without access to the original Model. I expect to see many new and inovative and realistic looking Colorscheme submissions in the future. Thank you!

Good Stuff, I'm excited about this..... :D
 

Attachments

  • ScreenShot1224840038.jpg
    ScreenShot1224840038.jpg
    109.7 KB · Views: 48
Last edited:
Back
Top