Another Spitfire

willsonman

Well-known member
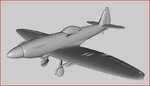
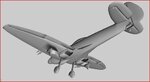
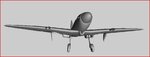
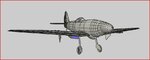
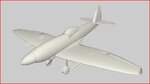
Well, My SB2C had been giving me some troubles so I decided to go at something else and see if issues would get ironed out that way. So here I am about 95% finished the work in Wings3D. Really why I am posting is to see if anyone is willing to do the pivots and hierarchy. Anyone interested? I'll do the CS if someone can get me the UV map. My wife does graphic design in photoshop and illustrator so she is going to help me there. I'll give a go with the physics since this is my first model. I just dont have the $ for 3dsmax. Anyways a picture to see what has been done.

It will have functioning flaps and radiator cowl flaps. The wheels will also be completely concealed. Bumps on top of the wings for the guns and two nice ones on each side. I still need to finish modeling the exhaust pipes on the side of the fuselage and finish the canopy.
 

Attachments

  • Spit 95% done.JPG
    Spit 95% done.JPG
    43.4 KB · Views: 52
  • Spit 95% done 3D.JPG
    Spit 95% done 3D.JPG
    33.1 KB · Views: 64
Last edited:
That Spit looks really good. I see you have the same problem I do as a modeler. Model them, but no means for the pivots and texture mapping. I've gotten a lot of help from the other modelers on getting my planes in. they are very helpful, but the thing is as many of my planes are waiting as well, getting them when they don't have anything going is near impossible. Keep up the good work
 
Nice!

I'd love to see the MK II modeled as this corresponds with the Hangar 9 .60 RC plane.
 
I'll second that. The Older marks were great looking. Maybe even the clip wing versions of the MkV's. All spits are great though. Looks awesome :)
 
opjose said:
Nice!

I'd love to see the MK II modeled as this corresponds with the Hangar 9 .60 RC plane.
Just browsing around this looks easily doable from what I already have. change 2 scoops and a couple other minor things. When I finish this I could just post the wings file for you to edit.
 
Yup, you aready have a more detailed airframe than those already posted.

I'd love to see them up.

The Spitfire hasn't been done justice yet.
 
Alrighty, I have finally finished the modeling of the spitfire. In making some of the finer details I decided to go with the Spitfire F MK. 24. Details for this are retractable steering gear, bulges at the front of the fuselage for the griffin motor, more "slats" for the exhaust, completely concealed landing gear when folded into the wing, the two large cannons on the wings. I did not include some minor things. See the pics and please give me some feedback.

I am attempting to learn blender for the pivots and UV map. This is my first plane so its all learning as I go. Thought the helldiver would be but it just had some quirks to it that I now know enough to go back and fix... probably redo for simplicity sake.
 

Attachments

  • done1.JPG
    done1.JPG
    38.7 KB · Views: 31
  • done2.JPG
    done2.JPG
    49 KB · Views: 41
  • done3.JPG
    done3.JPG
    32.8 KB · Views: 30
Great looking

I modeled a Stick to day.. Not the trainerr RC called a stick, Just a stick with another stick attached to it for a wing. :0


Might take me a few month but I'll get there.

Just keep the models coming and we'll try to get them all done :)
 
Thanks to cowboy for pointing out hard lines... looks much better now.
Thanks again Cowboy!
 

Attachments

  • hard lines.JPG
    hard lines.JPG
    30.3 KB · Views: 52
willsonman said:
Thanks to cowboy for pointing out hard lines... looks much better now.
Thanks again Cowboy!
Looks great Willson, will be another great spitfire for RF!
 
well, I have been toying around with Blender, Deep Exploration, GIMP, Illustrator and 3dsMax(demo) and in max I can get the pivot points and hierarchy done but am having some issues with importing a blank TGA file and assigning it to adefault material and applying it to every surface.
 
Last edited:
Well, Since I had been doing so much work on the Helldiver I have been neglecting this project. I've spent all day on it. Got all the pivot points right, even for retracts, which was a pain. The only thing is I need to work on flight physics. The flaps are funky how they extend at such a sharp angle and the flaps on the radiator cowls,... I just cannot get the thing to land without grazing the prop. Anyways. Just thought I would give an update.
 
So I have been attempting to do my own CS for this one a little this weekend. I have looked and tried two different methods for doing the alpha layer for the cockpit glass. cannot get either to work. Using GIMP... any help would be appreciated.
 
willsonman said:
So I have been attempting to do my own CS for this one a little this weekend. I have looked and tried two different methods for doing the alpha layer for the cockpit glass. cannot get either to work. Using GIMP... any help would be appreciated.
If you have access to max than simply use a seperate material for the canopy glass and set the opacity down to about 65%,then you dont need to worry about setting up an alpha channel in the TGA file.
 
But I thought you could only use one material for each aircraft? Is this how you do glossy and reflection?
 
willsonman said:
But I thought you could only use one material for each aircraft? Is this how you do glossy and reflection?

You can only use one material map or tga file correct. But in 3ds you can apply different materials (with different reflectiveness, gloss, transparency etc.) BUT these objects can not be "mapped" onto the main tga. CS

I use these additional materials all the time on my models.....you just have to know when and where to use them. Since you can't map these materials you can only apply to objects of solid color.

For example: I model all my tires "rubber" separate from the wheel rims (so then I just apply a "black" material on the tires)...this works especially well if you have an aircraft with a glossy paint scheme...because now that the tires are a separate material, you can dull just the tires down.

Have exhaust pipes on your model...just apply a solid material to them, same for gun barrels, landing gear, glass etc, etc.

It's hard to explain but simple in practice. Not only does this cut down on the objects you need to make room for on the CS map....it's just quick and easy to do.

To be honest I use this also as a "safeguard" in keeping some of my models from being changed by others. For example on the GeeBee I did...there were several objects that needed to be red (no additional details needed to be applied in the CS on these objects) so instead of mapping them on the CS tga I just applied a separate material with a matching solid red. Now if someone wanted to change the color of my GeeBee to lets say blue.....there would be numerous parts and pieces that would stay red!!hehe With no possible way for them to "paint" those parts blue.....thus keeping my work intact the way I wanted it.

I do this on most of my models in some form or another.

Glass is just another great place to use it....this way you can quickly change the "tint" and transparencty with the click of a mouse if you decide to change it.
 
Definitely,
Use as many material properties as necessary to give your model that final touch.
After so many hours modeling, it's the least one can do to help Realflight render a more realistic image.
There is no wrong way to do it really, it's a trial and error process and what looks good to your eye.
 
I suppose I am doing this incorrectly. I have tried to apply new materials to the canopy and also tried to apply reflectiveness to make the model glossy looking but I keep getting errors on export to kex saying that I need to use only one texture. Anyone want to PM me on how to do this properly?
 
Back
Top