
You are using an out of date browser. It may not display this or other websites correctly.
You should upgrade or use an alternative browser.
You should upgrade or use an alternative browser.
building / editing airports
- Thread starter Cubsterky
- Start date
adrenoline 60
New member
tilt, spin, and height of the objects
Once you have an Object Selected in the Environment Editor, it will be Highlighted, On the Field, and In the Folder Listings Window.
Directly below the Folder Listing Window, is the Properties Window.
Under Parameter, are listings of things you can change.
Click on each one, to see its description, at the bottom of the Window.
Relative Position (ft), is the Location: Left, Right, Front, Back, Up, Down. (X,Y,Z)
Orientation (deg):
Azimuth= Yaw.
Inclination= Pitch
Roll= Roll
adrenoline 60
New member
Custom Airport Object Orientation Tutorial
Note: Stock RealFlight files are Protected. You cant screw them up. If you edit a stock file, before you leave the editor, RealFlight will ask you to "save as". This will create a custom file, with your changes, while retaining the stock file unchanged.
Tip: When Creating a New File Name, using the Stock Name with a Suffix at the End is a good way to keep files organized. Example "Flight School Edit"
Try this.
We're going to Start with a Stock RealFlght Airport. Add a Static Scenery Object.
Position it, Orient it, and Resize it. Then "Save As" a New Custom Airport, file.
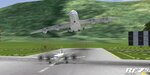
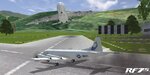
Lets start, using "Flight School" Airport, and Add a Static Scenery Object.
A Airbus A-380-800 "Aborting a Landing" over one of the runways.
Then, create a New File. and call it... Flight School Abort
Update:
Turns out the "Airbus A-380-800", used in this example, was a custom scenery object, Acquired by downloading a Custom 3D Airport, from the Swap Pages.
ESARC Island Retreat_AP, Link:
https://forums.realflight.com/downloads.php?do=file&id=20249
Note: After Installing Custom Airports, Containing Custom Scenery:
New, Custom Scenery, will be accessible, through, Environment Editor, Object Palette: Custom Objects>Scenery
Note: If you Delete the Custom Airport, that Supplied the Custom Scenery, the Custom Scenery will remain.
This is simplified procedure, creators sometimes use, to supply multiple scenery objects, in one download.
Open "Flight School" Airport, in RealFlight Program.
In the Main Menu. (Menu at the top of the Program Window)
Click "Environment"
Click "Edit Flight School". This will open the Environment Editor.
In the "Folder Listing" Window
Click the + next to "Objects" (to expand)
Click "Field" (this will be the parent, you will be loading your object into)
In the "Object Palette" Window,(upper right) Object Choices will now be available.
Click +, by Custom Objects
Click +, by Scenery
Click Airbus A-380-800
Click Add
Hover over the box, that lights up, on the field. That's your plane.
Click, Drag, and Drop it, just short of the Runway Intersection, runway center.
Right Click on Mouse. Click "Pan Camera".
Zoom in so you can see the aircraft. (You can use the keyboard +, - )
Right Click Mouse, Click "Normal Camera"
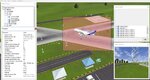
In the "Properties Window" Locate "Relative Position"
To the Right of "Relative Position", under "Value", Click the "X="
This will expand the X,Y,Z Location edit block.
Adjust the "Height" Z to 10 Click OK
This will place your Object (airplane) 10 (ft) Above the runway.
Now in the "Properties Window" Drop down to "Orientation (deg)."
In the Value column, Click "azm=" this will expand the azimuth, inclination, roll, input box.
Click Azimuth= -45. OK. Watch how plane adjusts.
Click Inclination= 10. OK. Watch how plane adjusts.
Click Roll=10. Watch how plane adjusts.
Now move down to Scale. Adjust to 200%. Click Enter on Keyboard.
Now Click "File" near the top Left corner of the Screen.
To Exit the Editor, to return to the Simulator.
Clicking Exit to Simulator Should bring up a "Verify Box" Since this was a Stock RealFlight File. It will ask you, Do You Want To Save Your Changes?
Click Yes.
Since this is a Stock File:
A box will open, asking you to name your "New File".
Call it... Flight School Abort
Your new Airport will be listed under, "Custom Airports" in the Main Menu. Environment>Select Airport
On future edits, of a Custom File, you will Not be required to rename the file.
Important Note:
Clicking No When this dialog box comes up is a Safety.
In the event, something goes wrong, during an edit, Clicking No, will cancel all changes made, in That editor session, and revert the file, back, to the state it was in, prior to entering the Editor.
Exiting the editor will take you back to the program.
If you wish to Delete this Custom Airport, when you are finished:
In the Main Menu Click: Simulation>Manage User Files>+ Airports>+ Sierra Nevada>Flight School Abort. Delete
Note: Stock RealFlight files are Protected. You cant screw them up. If you edit a stock file, before you leave the editor, RealFlight will ask you to "save as". This will create a custom file, with your changes, while retaining the stock file unchanged.
Tip: When Creating a New File Name, using the Stock Name with a Suffix at the End is a good way to keep files organized. Example "Flight School Edit"
Try this.
We're going to Start with a Stock RealFlght Airport. Add a Static Scenery Object.
Position it, Orient it, and Resize it. Then "Save As" a New Custom Airport, file.
Lets start, using "Flight School" Airport, and Add a Static Scenery Object.
A Airbus A-380-800 "Aborting a Landing" over one of the runways.
Then, create a New File. and call it... Flight School Abort
Update:
Turns out the "Airbus A-380-800", used in this example, was a custom scenery object, Acquired by downloading a Custom 3D Airport, from the Swap Pages.
ESARC Island Retreat_AP, Link:
https://forums.realflight.com/downloads.php?do=file&id=20249
Note: After Installing Custom Airports, Containing Custom Scenery:
New, Custom Scenery, will be accessible, through, Environment Editor, Object Palette: Custom Objects>Scenery
Note: If you Delete the Custom Airport, that Supplied the Custom Scenery, the Custom Scenery will remain.
This is simplified procedure, creators sometimes use, to supply multiple scenery objects, in one download.
Open "Flight School" Airport, in RealFlight Program.
In the Main Menu. (Menu at the top of the Program Window)
Click "Environment"
Click "Edit Flight School". This will open the Environment Editor.
In the "Folder Listing" Window
Click the + next to "Objects" (to expand)
Click "Field" (this will be the parent, you will be loading your object into)
In the "Object Palette" Window,(upper right) Object Choices will now be available.
Click +, by Custom Objects
Click +, by Scenery
Click Airbus A-380-800
Click Add
Hover over the box, that lights up, on the field. That's your plane.
Click, Drag, and Drop it, just short of the Runway Intersection, runway center.
Right Click on Mouse. Click "Pan Camera".
Zoom in so you can see the aircraft. (You can use the keyboard +, - )
Right Click Mouse, Click "Normal Camera"
In the "Properties Window" Locate "Relative Position"
To the Right of "Relative Position", under "Value", Click the "X="
This will expand the X,Y,Z Location edit block.
Adjust the "Height" Z to 10 Click OK
This will place your Object (airplane) 10 (ft) Above the runway.
Now in the "Properties Window" Drop down to "Orientation (deg)."
In the Value column, Click "azm=" this will expand the azimuth, inclination, roll, input box.
Click Azimuth= -45. OK. Watch how plane adjusts.
Click Inclination= 10. OK. Watch how plane adjusts.
Click Roll=10. Watch how plane adjusts.
Now move down to Scale. Adjust to 200%. Click Enter on Keyboard.
Now Click "File" near the top Left corner of the Screen.
To Exit the Editor, to return to the Simulator.
Clicking Exit to Simulator Should bring up a "Verify Box" Since this was a Stock RealFlight File. It will ask you, Do You Want To Save Your Changes?
Click Yes.
Since this is a Stock File:
A box will open, asking you to name your "New File".
Call it... Flight School Abort
Your new Airport will be listed under, "Custom Airports" in the Main Menu. Environment>Select Airport
On future edits, of a Custom File, you will Not be required to rename the file.
Important Note:
Clicking No When this dialog box comes up is a Safety.
In the event, something goes wrong, during an edit, Clicking No, will cancel all changes made, in That editor session, and revert the file, back, to the state it was in, prior to entering the Editor.
Exiting the editor will take you back to the program.
If you wish to Delete this Custom Airport, when you are finished:
In the Main Menu Click: Simulation>Manage User Files>+ Airports>+ Sierra Nevada>Flight School Abort. Delete
Attachments
Last edited:
csgill75
Well-known member
Would it be possible for someone to place some snow on the Alpine lake, and also put some skis on one of the DHC 2 Beavers for those of us north of the Mason Dixon Line?
Snow does not work like real snow in RealFlight. You will need wheels.
There are a couple airports that have white colored dirt that resembles snow. I believe they are in the free add-ons.
csgill75
Well-known member
Building new objects requires 3ds max, the 2012 version which is not available anymore.
There are many threads in the older versions of realflights designer corners that have a ton of information. Use the search function on the forums to find it. The information from the older versions of realflight are still applicable to 7.5. The process and editors are either the same or similar.
Here is one to get started with,
https://forums.realflight.com/showthread.php?t=27905
csgill75
Well-known member
Hi,
First stab at using the Scenery Editor. Following your above example it fails at -
'In the "Object Palette" Window,(upper right) Object Choices will now be available.'
Err no, it's empty. In the box below it has a list of objects but no Custom Objects / Scenery folders. Where is the A380 hiding?
First stab at using the Scenery Editor. Following your above example it fails at -
'In the "Object Palette" Window,(upper right) Object Choices will now be available.'
Err no, it's empty. In the box below it has a list of objects but no Custom Objects / Scenery folders. Where is the A380 hiding?
BrokeDad
Well-known member
If you want a clean slate for building a 3D airport I uploaded the Sierra Nevada one with everything deleted quite a while back.
https://forums.realflight.com/index.php?resources/22479
https://forums.realflight.com/index.php?resources/22479
legoman
Well-known member
Hi,
First stab at using the Scenery Editor. Following your above example it fails at -
'In the "Object Palette" Window,(upper right) Object Choices will now be available.'
Err no, it's empty. In the box below it has a list of objects but no Custom Objects / Scenery folders. Where is the A380 hiding?
you will need to import the a380's kex file into rf as an airport object. it is currently an "airplane" not an "airport object"
adrenoline 60
New member
Hi,
First stab at using the Scenery Editor. Following your above example it fails at -
'In the "Object Palette" Window,(upper right) Object Choices will now be available.'
Err no, it's empty. In the box below it has a list of objects but no Custom Objects / Scenery folders. Where is the A380 hiding?
OOPS, Sorry about that. I went back, and Updated Post 3, with the link, that will supply the Airbus A-380-800 scenery object.
https://forums.realflight.com/showpost.php?p=275748&postcount=3
Last edited:
Fly_electric
Well-known member
Have made a few building objects, but would like to edit an existing (or create a new) runway surface for RF8.
So a few questions I trust someone can answer or provide a link to a thread where it is discussed in detail:
Can a custom CS be made for an existing runway object?
If created from scratch in max, is it just a plane, or a very thin box?
Any particular naming conventions?
tga file location? spec maps?
Is there a max or RF setting that forces the runway object to follow the shape of the terrain?
What is the setting that forces the planes' wheels to interact with the runway edge, i.e. the runway has some height the wheels need to roll up over?
Thanks in advance!
Edit: Does any of the above differ (and if so how) between CG and photo realistic fields?
Last edited:
legoman
Well-known member
Have made a few building objects, but would like to edit an existing (or create a new) runway surface for RF8.
So a few questions I trust someone can answer or provide a link to a thread where it is discussed in detail:
Can a custom CS be made for an existing runway object?
If created from scratch in max, is it just a plane, or a very thin box?
Any particular naming conventions?
tga file location? spec maps?
Is there a max or RF setting that forces the runway object to follow the shape of the terrain?
What is the setting that forces the planes' wheels to interact with the runway edge, i.e. the runway has some height the wheels need to roll up over?
Thanks in advance!
Edit: Does any of the above differ (and if so how) between CG and photo realistic fields?
I believe it needs to be a 2d surface not a thin box, and imported as a projected scenery object