herc40
New member
Remember: everything that is taught in these lessons, are directed to G3 and G3.5 users. Most parts can be used by G4 and G4.5 users to create the basic CS page, but this guide does not cover BUMP mapping. You can use one lesson on a CS, are all of them, the choice is up to you.
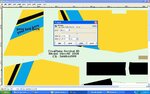
These are some techniques I've learned, doing CS for RF aircraft. If you love making CS as much as I do, you will find these useful tips will help you enjoy your creation. You must first pic a plane or heli, that you want to change the CS on. Then click on AIRCRAFT, then SAVE CS AS, you will need to give it a new name. In the Real Flight Simulator, open the CS you just named, it will create a DDS file for the CS. Then find the new named CS in your RF directory, under COLOR SCHEMES, open the TGA file with Gimp. Good luck.
AIR BRUSHED EFFECTS:
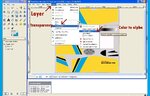
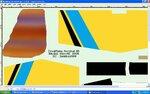
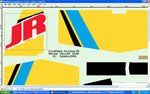
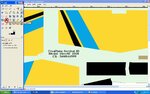
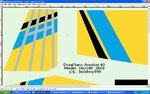
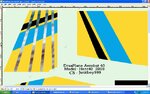
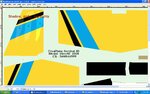
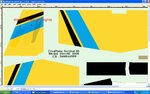
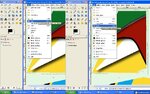
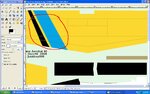
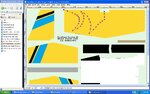
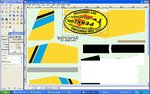
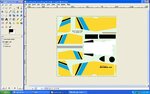
The best way I've found to do this, is to grab the FREE SELECT ( it look like a Cowboy lasso) on the gimp menu to the left of your screen. On your CS page, get as close to the part you want to air brush, left click and HOLD. Draw a complete circle around the part, following the conture of the part as closely as you can, without going into the part. SEE PIC Tail As you can see I didn't get as close as I could have, to prove the next point.
[You want to draw this line as closely to the part as you can, because the background color will be colored as well.]
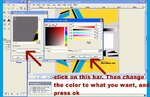
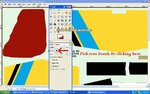
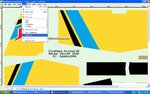
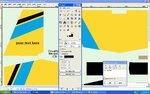
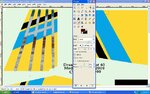
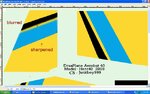
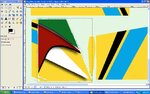
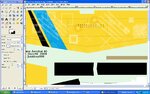
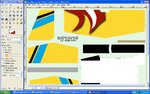
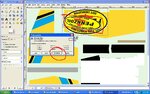
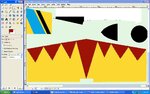
When you have a complete circle around the part, click on the PENCIL icon, now pick your base color. Paint the part you've free selected with the base color, SEE PIC base. Don't worry about getting anything on the surounding parts, it will not happen.
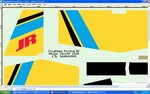
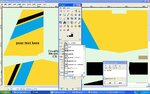
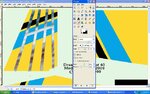
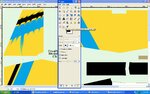
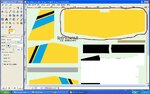
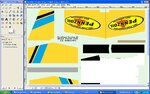
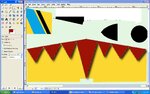
Now that you have a base color, pick your AIRBRUSH icon, making sure you also pick the biggest FUZZY brush. SEE PIC pick your airbrush, Now you are ready to let your creation come to life, just pick another color that compliments the base color and make a stroke with your airbrush. It is good to use the SCALE BAR to scale it up to the size you need, and if the stroke is to much color at one time, EDIT and UNDO that stroke, use the OPACITY BAR to get the desired effect you are looking for.
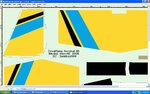
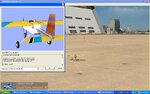
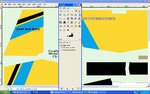
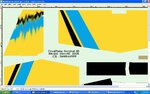
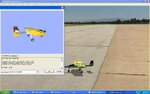
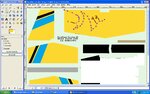
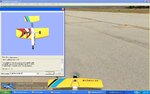
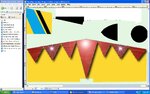
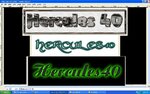
After the part is colored to your liking, SEE PIC airbrushed, save the CS page uncompressed, by using FILE, SAVE AS, REPLACE, then when the SAVE BOX pops up UNCHECK BOTH BOXES, and press SAVE. DON"T CLOSE YOUR CS PAGE, LEAVE IT OPEN. Look at your changes to the CS in RF, By clicking on the name of the CS you are working on, if it is not how you want it just bring up the CS page and change it some more, until the part is the way you want it. SAVE this time and you will skip the REPLACE part of saving the CS.
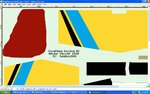
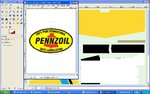
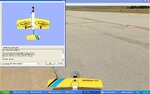
SEE PIC CS changes, Change, look, and like the look of it before you go on. When you are completely satisfied, that the part is right, save your work. Close your CS page, then reopen it, you will now see that the FREE SELECT is no longer selected, please keep in mind, that NOW if you try to color that section it will color everything on the page, unless you free select it again. Now repeat the process on the rest of the CS parts.
Good luck and my best to you.
I hope this is helpful to all using the Gimp program, and I will give more tip in this thread, in the future. PLEASE do not comment on this thread, until I have completed the work I intend. If you have any question you would like to ask, feel free to PM me, and I will help you if I can. I work long days away from the internet, so don't feel neglected, if I don't answer right away. Thank You!!!!!
These are some techniques I've learned, doing CS for RF aircraft. If you love making CS as much as I do, you will find these useful tips will help you enjoy your creation. You must first pic a plane or heli, that you want to change the CS on. Then click on AIRCRAFT, then SAVE CS AS, you will need to give it a new name. In the Real Flight Simulator, open the CS you just named, it will create a DDS file for the CS. Then find the new named CS in your RF directory, under COLOR SCHEMES, open the TGA file with Gimp. Good luck.
AIR BRUSHED EFFECTS:
The best way I've found to do this, is to grab the FREE SELECT ( it look like a Cowboy lasso) on the gimp menu to the left of your screen. On your CS page, get as close to the part you want to air brush, left click and HOLD. Draw a complete circle around the part, following the conture of the part as closely as you can, without going into the part. SEE PIC Tail As you can see I didn't get as close as I could have, to prove the next point.
[You want to draw this line as closely to the part as you can, because the background color will be colored as well.]
When you have a complete circle around the part, click on the PENCIL icon, now pick your base color. Paint the part you've free selected with the base color, SEE PIC base. Don't worry about getting anything on the surounding parts, it will not happen.
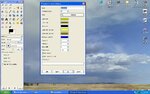
Now that you have a base color, pick your AIRBRUSH icon, making sure you also pick the biggest FUZZY brush. SEE PIC pick your airbrush, Now you are ready to let your creation come to life, just pick another color that compliments the base color and make a stroke with your airbrush. It is good to use the SCALE BAR to scale it up to the size you need, and if the stroke is to much color at one time, EDIT and UNDO that stroke, use the OPACITY BAR to get the desired effect you are looking for.
After the part is colored to your liking, SEE PIC airbrushed, save the CS page uncompressed, by using FILE, SAVE AS, REPLACE, then when the SAVE BOX pops up UNCHECK BOTH BOXES, and press SAVE. DON"T CLOSE YOUR CS PAGE, LEAVE IT OPEN. Look at your changes to the CS in RF, By clicking on the name of the CS you are working on, if it is not how you want it just bring up the CS page and change it some more, until the part is the way you want it. SAVE this time and you will skip the REPLACE part of saving the CS.
SEE PIC CS changes, Change, look, and like the look of it before you go on. When you are completely satisfied, that the part is right, save your work. Close your CS page, then reopen it, you will now see that the FREE SELECT is no longer selected, please keep in mind, that NOW if you try to color that section it will color everything on the page, unless you free select it again. Now repeat the process on the rest of the CS parts.
Good luck and my best to you.
I hope this is helpful to all using the Gimp program, and I will give more tip in this thread, in the future. PLEASE do not comment on this thread, until I have completed the work I intend. If you have any question you would like to ask, feel free to PM me, and I will help you if I can. I work long days away from the internet, so don't feel neglected, if I don't answer right away. Thank You!!!!!
Attachments
Last edited:


 Thank you herc40