Junkboys Warthog A-10

Junkboy999

New member
Ok I have posted some picture of this in the forums but I thought I'd start a thread for it. I'm pretty well done with the fuselage and I still have some polys left. I still plan to do a simple cockpit and pilot. I need some antenna and EW censers on it. This will be the first one that I will be try a Bump map and all.

Don't mind the line behind the cockpit. I had to Loop cut the back of the body off to work on the back so I could mirror it sense the gun and the nose wheel on the front are off centered.
 

Attachments

  • A10-25.JPG
    A10-25.JPG
    29.6 KB · Views: 22
  • A10-26.JPG
    A10-26.JPG
    25.9 KB · Views: 28
  • A10-27.JPG
    A10-27.JPG
    34.1 KB · Views: 34
  • A10-28.JPG
    A10-28.JPG
    29.9 KB · Views: 28
Look real nice JB........It'll be nice to have an A-10 the does not have that an un-fixable dead spot on one of the Ailerons like the Add-On version :D
 
Cowpig said:
Also, the Add-ons A-10 had the gun and front landing gear on the wrong sides.


Ya I did not like that left aileron , that is why I started this one last year. I started over on this project a few times now. I never noticed the gear and gun on the wrong side on the Ep 3 one.
 
Testing and Rotating your Gear in Wing 3d

Testing and Rotating your Gear in Wing 3d

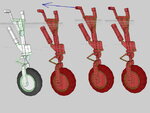
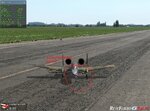
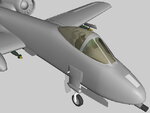
Ha guys and gals and modelers. I have a Modeling tip for people using Wings 3D. When I use to test my gear to see if they would rotate up and not hit the gear door or the fuselage. I use to just duplicate the gear and move one up to the Gear UP position. Rotate, Move, Rotate, move not the best way because the gear rotates around it own center

Taking a better look at the Menu bar at the bottom left corner of the Wings 3D work area, I figured out a better way to test my gear.

First you need to make a handle on the gear to where you believe the pivot point is. The handle need a flat surface on the X axis. Next you need to extend the handle out past the Fuselage where I can select it. Select the gear in body mode, right click the screen to bring up the menu, pick ROTATE , but pick ROTATE with the Center Mouse Wheel. Once you selected it with the center button it will turn a spotted red and white. The red and white is telling you it is waiting for an input. Now select the handle face with the left button ( L : Pick axis ) then Right button ( R: Continue ) you have an arrow now perpendicular to that face.

Next select the same face again with the left button ( L : Pick axis ) and you'll see a Red dot show up on that face. Now click the right button ( R: Continue ) the dot will disappear and if you move you mouse from left and right, the gear will be rotating using the face as a pivot point.

To stop the rotating you hit the left button again.

If you are careful when you are rotating it you can hit the center scroll wheel and now rotate the full model around to get a better angle of your gear, hit the right button to stop the View rotate, and you still should be able to move the mouse left and right to make the gear rotate. ( as long as you did not hit any other button )
 

Attachments

  • RTIP01.JPG
    RTIP01.JPG
    91.3 KB · Views: 24
  • RTIP02.JPG
    RTIP02.JPG
    37.3 KB · Views: 19
Last edited:
Marking out gear doors

The second part of this tip is marking out your gear door. I mark out where the cuts will be and use HOLE material in the version . 9 or a transparent material in wings 3d Ver 1 . 0

The transparent material and the ability to rotate the gear now make it really easy to figure out if you need to change things before you cut them out.
 

Attachments

  • RTIP03.JPG
    RTIP03.JPG
    59.4 KB · Views: 27
More detail

Started to add more detail and slowly working one reducing unneeded polygons.
Nemo_UK's Pilots needs some arms and legs so I need to get working. So far Pilot, Ejection seat and Instrument panel take up 1260. I want to be able to have at leas 4 bombs and pylons so back to taking out more polygons.
 

Attachments

  • A10-29.JPG
    A10-29.JPG
    48.2 KB · Views: 21
  • A10-30.JPG
    A10-30.JPG
    32.2 KB · Views: 18
  • A10-31.JPG
    A10-31.JPG
    28.8 KB · Views: 14
Last edited:
Cowpig said:
Also, the Add-ons A-10 had the gun and front landing gear on the wrong sides.
Before I forget...

Compare add-ons A-10 to real A-10.
 

Attachments

  • A-10.jpg
    A-10.jpg
    470 KB · Views: 47
  • A10WarthogFront.jpg
    A10WarthogFront.jpg
    202.9 KB · Views: 27
Last edited:
Added the bombs. Finished the Engines. Pilot is finished. I'm standing a 19,444 polygons if wings triangle option is correct. I will not have any time to map it this weekend so I'll keep on plugging away at some smaller detail and removing wasted polygons.

Ya Cowpig I caught that, thanks.
 

Attachments

  • A10-32.JPG
    A10-32.JPG
    30.1 KB · Views: 23
  • A10-33.JPG
    A10-33.JPG
    56.2 KB · Views: 22
Last edited:
I'm dropping the bomb on the polyies

I'm dropping the bomb on the polyies. Got to get them down. I'm still working on hard points, ECM pods, and antenna. Wingman57 let me use his bombs. I use them as a guide and made a Medium and Low poly count set as well. Have to save polyies any where I can.

I even went back and cut off the feet of the pilot. You cant see them any way. :eek:
 

Attachments

  • A10-34.JPG
    A10-34.JPG
    73.3 KB · Views: 16
  • A10-37.JPG
    A10-37.JPG
    61.7 KB · Views: 20
  • A10-38.JPG
    A10-38.JPG
    38.7 KB · Views: 30
Last edited:
Terry, please tell us you promise not to map at least one of the control surfaces, preferably an aileron...leave it grey and unpaintable or it just won't seem right! ;)

Looking gooooood,

Griff
twoeleven
 
Well Version 6 of the A-10 is in RealFlight and it is looking good for the most part. Two gear doors are a bit off need to reset the pivots and the flaps are a bit off as well

The two tail have a sharp line in them so I might have to take it back to wings. she is at 18,928 polys
 

Attachments

  • A10-39.JPG
    A10-39.JPG
    91.3 KB · Views: 31
Back
Top