Junkboys Warthog A-10

Turbine question

Ok I been reading up on the forums and I have not seen any real success with making a turbine fan spin realistically. I'm thinking of modeling in the Booster 90 Turbine that is used on a few of the A-10 RC jets. Any suggestions or comments.
 

Attachments

  • A10-40.JPG
    A10-40.JPG
    62.7 KB · Views: 6
  • A10-41.JPG
    A10-41.JPG
    66.4 KB · Views: 22
  • BOOSTER.JPG
    BOOSTER.JPG
    40.3 KB · Views: 6
Last edited:
I got a question for you MikeyMike21

How deep can I get these using a bump map. ???? There are about 8 on the jet. I not sure if I want to model them all.

Are they doable with a Bump map.
 

Attachments

  • A10-42.JPG
    A10-42.JPG
    38.8 KB · Views: 20
Last edited:
Ya I knew that . I should of ask how deep will they appear. Can I get that shadow appearance on one side fading out to flat with no shadow on the other side.?

I still need to reinstall G4 back on my vista computer so I can go through any G4 models to compare the look.
 
Terry, Looks great!

Attached is a 5 min. job on the ducts using normal maps and a touch of paint. Keep in mind this is only a 1024 x 1024 map, much smoother transitions are possible at higher resolutions, and if you spend a few more than 5 minutes doing them.

Also, to see this effect (normal + paint) from different angles, look at the naca ducts near the front of the windscreen in the preview shots here: https://forums.realflight.com/index.php?resources/13278

Modeling them will be the best from all angles, but a well-executed bump map will do just fine from 5 feet away, IMO.

Good luck,

Griff
twoeleven
 

Attachments

  • Wart.jpg
    Wart.jpg
    430.4 KB · Views: 43
Great Mikey and 211

That is just what I was wondering about. I still plan to release a G3.5 EA of the model after I do a G5 one so I still might model in a few bumps and Highs by hand.
Getting G5.5 for Christmas. Talked my self in to buying it for me. :D
 
Well I have to Put the A-10 back on a Diet again. It was getting to Poly Heavy. I change the way the wings attach to the Fuselage. I had a small part of a wing root attached on the Fuselage. I cut that off and extended the wing to the fuselage. I re-scaled the wing to Fuselage fairing. Making it smaller and a few less polys.

The wing tips went on a diet as well. I deleted two loops line that ran around the tips to save even more polys.

I had more poly now so I added a mid wing stall plate ( not sure what it is really called )
 

Attachments

  • A10-43.JPG
    A10-43.JPG
    99.6 KB · Views: 22
  • A10-44.JPG
    A10-44.JPG
    25 KB · Views: 11
  • A10-45.JPG
    A10-45.JPG
    28.7 KB · Views: 18
  • A10-46.JPG
    A10-46.JPG
    56.8 KB · Views: 12
Ok finished the small indents and some other small detail. I'll be adding some EW censers and antenna. I will be mapping it next weekend.
 

Attachments

  • A10-47.JPG
    A10-47.JPG
    37.7 KB · Views: 27
  • A10-48.JPG
    A10-48.JPG
    39.4 KB · Views: 41
Thanks Brent

Well I started the A-10 Map. This is just the fuselage. I use the Trick of selecting all the faces of an Object ( the fuselage as and Exp ) so I can move the whole thing down 30 units lower them the rest of the model. This allows me to be able to select what faces I want to map together by assigning chart colors to them with out having all the other parts near by.

I place the part on the side of the map area while I align the parts. I scale, Cut apart and Switch the part back together the say I want. I'm going to keep the front part of the fuselage a bit larger them the rest of the map. Most of the detail is up there any how.
 

Attachments

  • A10-49.JPG
    A10-49.JPG
    69.5 KB · Views: 27
  • A10-50.JPG
    A10-50.JPG
    117 KB · Views: 44
Ok Back from my break home for Christmas and the new year. I did a little bit of mapping while home. My poor laptop is so slow I have to delete half the model and only map one half. The mirror trips did the trick.

I still have a few over laps and need to scale some things to get better use out of the map space.
 

Attachments

  • A10-51.JPG
    A10-51.JPG
    162.2 KB · Views: 24
  • A10-52.JPG
    A10-52.JPG
    89.4 KB · Views: 30
Last edited:
Ok map is finished , now for some test paint to see if every thing will come out all right. That's a lot of paint to do.
 

Attachments

  • A10-54.JPG
    A10-54.JPG
    173 KB · Views: 40
A-10

and an A-10 for the modeling on this one Terry , been following the build on it and look forward to the finished model
 
This build is lookin great!

Is there a "primer coat" finish version that maybe folks could start paintin on? ...understand of course if you'd prefer to take your time and apply the first skin.

Waiting patiently...
 
Last edited:
Thanks guy

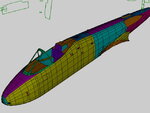
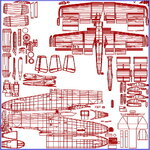
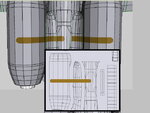
The map has the added benefit of being almost complete symmetrical between parts having both a right and left side. This was caused by mapping only one half of the model and then mirroring it and separating the two half's. I tried really hard to place the mirrored side and the other side on the same X axis. This will allow a Re-Painter to easily paint one part on one side then Select, Copy, Paste, Flip, Move where it is needed, and Stamp.

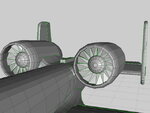
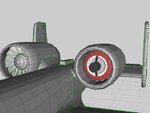
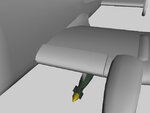
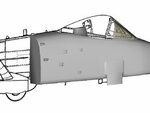
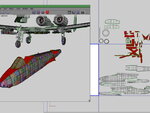
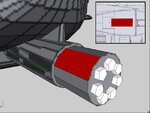
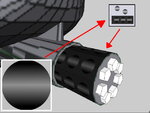
I did over stamp a few parts on the map like the back side of the vertical stab. None of the pictures I looked at had any writing on the back side. The top of the engines and the bottom of the engines are over stamped too. Any one doing a camo paint job will still be able to do one providing they allow for both tops to look the same. The two outboard sides of the engines cowls are each separate so different base logos with text can be attached. I came up with the ideal of just painting the gun barrel cover rather then modeling all the cooling holes. This will have a nice effect in G3 and hopefully even better with a Bump map for G 4 and G5 users.

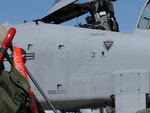
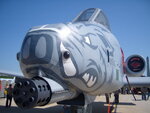
I plan on doing the 188th Fighter Wing, located in Ft. Smith, Arkansas. This is the home to the 184th Fighter Squadron flying the A-10 " THE FLYING RAZORBACKS " Go Hogs!!!

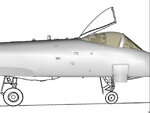
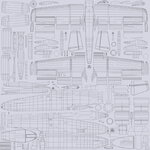
I will upload a plane gray and a desert tan paint job allonge with a blank map to the Net somewhere for other to have a try at paintin.
 

Attachments

  • A10-55.JPG
    A10-55.JPG
    68.5 KB · Views: 19
  • A10-56.JPG
    A10-56.JPG
    62.5 KB · Views: 17
  • A10-57.JPG
    A10-57.JPG
    57.5 KB · Views: 27
  • A10-58.JPG
    A10-58.JPG
    39.1 KB · Views: 22
Boy I cannot wait to see this one flying, always hated that Add-Ons Warty, that dead spot was just irritating, but ya know what?! I used to work on them real Wartys (for a short time in Tech School, the systems were pretty similar to the F-16s I was training for.) and never once noticed that the Addy's Nose gear was wrong!
 
The black lighting scheme should be easy to do. The gold line going under the nose will be a bit tricky but it should work. Take a look at this Decal sheet for some ideals on the Text


Let me see, what will A-10 and F-10 have in common. Where you a Comm/Nav in the service? I was a Comm/Nav troop for 20Y 1 m and 7 days. Not like any one else was counting but me.
 
Back
Top