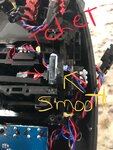
I had to spread this info. When I opened my RF-X Interlink-X controller on my Real flight 8 I discovered that there are two rows on the ratchet throttle. One with notches and one without. All that was needed was to use a second row of screw holes and move the sping tensioner over to the smooth row. No tubing or straws,no flipping of the spring etc. Just my two cents but I had to register because it was so easy I wanted to spread the word. Now I have a Heli radio on my simulator.
")
Hope this helps someone else. 3dwannab2