Turbine Toucan Build

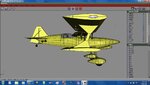
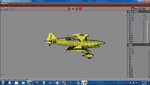
I didn't want to get boof's fire boss thread too off topic so I'll post this here for you. You posted a pic to compare your toucan geometry to his fire boss to see how he got all the detail for roughly the same poly count. First off you have to remember that you've also added several modeled servos and their components to your build.....which bumped up the poly count a fair amount I'd guess.

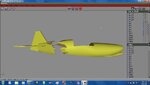
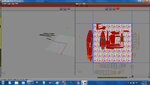
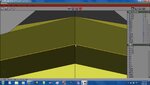
Here is a comparison of your screen shot and an example of some "cleanup" that you could use on future models etc. The area from the front of the canopy to the rear of the canopy had numerous vertical "formers" to get the shape / outline of the canopy top edge (which is how I start my canopies as well) However when roughed in, I then go back and clean up the vertical formers and remove the bottom portions (that aren't used in the "canopy area") These formers can now stop at the canopy to fuse joint (which is typically set as a hard line)

I just roughed in (in photoshop) what the geometry could look like.
 

Attachments

  • zz.jpg
    zz.jpg
    94.4 KB · Views: 14
  • zz example.jpg
    zz example.jpg
    124.9 KB · Views: 19
I don't mind any such discussion in any of my build threads pplace. I gave Andy much the same advise in my thread. Along with other areas that may help.
 
I will keep those areas in mind on future builds. I also now know where to rob some pilots now if I need them for the rest of the build :rolleyes:Thanks alot guys.
 
As pplace said these are things that are performed during the clean up process. No need to wait til the next build. My models look just like yours do before I do clean up. It's good to keep poly count low for better performance in RF. Not just for room for more detail.
 
Ill give it a shot, but later on. Im racking my brain in another area right now, an area that I feel will be worth the effort. ;)
 
Keep in mind that if you delete the edges below your canopy, you may not have a perfect fit between your canopy and fuselage anymore.
 
jeffpn said:
Keep in mind that if you delete the edges below your canopy, you may not have a perfect fit between your canopy and fuselage anymore.

Good point jeff. Unless he has yet to "loop cut" the canopy away from the fuse. I typically wait till the very end when all clean up / final shaping is totally complete before loop cutting and removing items from the parent object (i.e. ailerons, elevators, rudder, canopy, etc.)

But if he already has the canopy cut from the fuse, as long as he leaves the verts that deal with the bottom canopy shape / fuse opening completely alone he won't have any fit issues.
 
Yes and no. In my experience it depends on the canopy. Most of the time I will remove the unnecessary lines but leave the verticies at the line where the canopy meets the fuselage. More lines and verts on a canopy is a good thing as the alpha tends to show more angles and lack-of-polygons than say a fuselage.
 
I was checking out the canopy lines to see if they were messed up or not when I noticed this. As you can see from the front view, you can see a light area that looks like the canopy is mismatched to the fuse. However, when I zoom in as close as wings will let me, (and still keep everything in view) you can see that everything lines up good. Is this just something that happens where you hard line two oblects that are next to each other? This is happening all the way around the canopy, but nowhere else with hard lines. Ive double.....triple checked ALL of the verts along the edges of the fuse and canopy, and all are lined up just as this one is. :confused:
 

Attachments

  • zz.jpg
    zz.jpg
    91.1 KB · Views: 20
  • zz3.jpg
    zz3.jpg
    104 KB · Views: 19
  • zz1.jpg
    zz1.jpg
    98.6 KB · Views: 15
  • zz2.jpg
    zz2.jpg
    78.3 KB · Views: 15
If you already loop cutted the canopy (didn't reread that far back, but based on some of the pictures, I'm assuming that), it's just natural, viewed from a distance, and in rendered view.
 
Ive almost got most of the bugs worked out of the final touches (sorry, no screenys just yet). I didnt eat the polies quite like I figured I would. Im at 14316 at the moment, but there are more to come. Hopefully, If I get to work on it like I plan to, Ill get to the mapping by the end of the week.
 
Well, I think Ive kept you in the dark long enough. Here's a peek at what Im working on.
 

Attachments

  • zz.jpg
    zz.jpg
    81.4 KB · Views: 23
  • zz1.jpg
    zz1.jpg
    83.4 KB · Views: 18
  • zz2.jpg
    zz2.jpg
    82.2 KB · Views: 18
What's old is new again.

Pretty cool, I remember crashed_again doing breakaway birds like this a few years ago.
Gives a realistic RC touch.
 
To complete the illusion, you know you're going to have to paint all the interior broken balsa bits. :D
 
Thats exactly what I mean, it takes time..........LOTS of time :p

Not to mention the inside of the fuse. ;)
 
Well, Im to my least favorite part of the build, mapping. Ive done the fuse a couple of times now, and I keep coming up with all of these extra parts (the red ones) that are going to be hidden and not visible, but necessary to do the fuse for the breakapart design. Being new to this, do I need to leave these mapped and overlap them with another part of the fuse, or can I just delete them since they will not be seen? I have left them unmarked while mapping, but they keep showing up.
 

Attachments

  • zz.jpg
    zz.jpg
    125.6 KB · Views: 12
Back
Top