Ultra Stick 1.1m

technoid

Well-known member
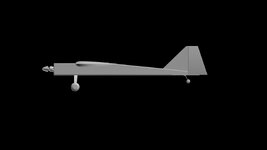
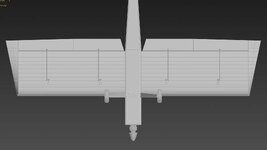
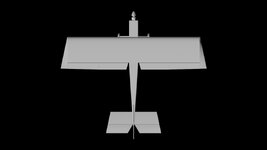
Recently some people were looking for the Ultra Stick 1.1m so I thought I'd take one of my sticks and create one. I've never modeled a small plane (43.3 in wingspan) and I've never used AS3X, so I thought it was time to go small and automated. I've still got some tweaking to do but here's where I'm at now.
Ultra Stick 1.1m 00.jpgUltra Stick 1.1m 01.jpgUltra Stick 1.1m 02.jpg
 
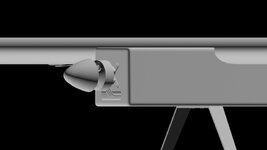
I did some more work on the Ultra Stick today. I finished the landing gear and the tail gear and also switched out my old tires for my latest tires on the landing gear. They definitely look better. I still have to switch out the tail gear tire, but I got tired and needed to stop. I also reworked the wing hold down bolt to match the way the Ultra Stick has it. Some nice progress.
 
I understand better the amount of work you put into the plane projects. I’m a little embarrassed to think it would be just an 1/2 hour retrofit.

wish I was as talented as you!
bill
 
I understand better the amount of work you put into the plane projects. I’m a little embarrassed to think it would be just an 1/2 hour retrofit.

wish I was as talented as you!
bill
Yeah I wish it was just 1/2 hour to retrofit it. There are LOTS of steps to create a model. Having a model to use as a starting point is helpful but you generally have to reshape a lot of parts so it only saves a little time, not nearly as much as you think. I had to reshape the wings and ailerons and also increase the width of the ailerons. The hstab and vstab was reshaped the vstab was mostly a complete new part. The landing gear had to be reshaped, the tires had to be resized and then I actually replaced the tires with a new design I did a while back that looks much better. The tail gear was mostly completely redone too. There was also quite a bit of time using some pictures to create a plan, but not a good plan because none of the pictures was straight on like you need to model from. But it worked, sort of. A lot of eyeballing was done too.

Then you have to what's called "map" the plane before you can create a color scheme which has 3 phases. First you map each part separately, second you resize all the individual parts to make each part fit correctly to their relative size. (when you map each part the first time all the parts are the same size so you have to go back after the first mapping phase and set each parts relative size. Then the last phase is called 1x1 mapping which takes all the individual parts and adjusts their position to make a stripe that crosses from one part to another part align correctly. Then you create a mask that's used in the color scheme to paint the plane. Then you paint all the parts. Once that's done you have to do the physics. That means you use the RealFlight editor to size each part correctly and then put it in the correct place. Then you have to adjust the weight of each part to get the plane weight. After that you have to adjust the different parts to get the planes CG to be correct. So there is a lot of work in many phases to create a 3d model and the physics for it. Generally, it takes me a month at least to model a plane.
 
Last edited:
I’m so sorry to have asked for a plane. Wish I could repay for your efforts. I certainly could not afford to repay the work you put in. If we ever cross paths I would gladly buy you a beer or two!

I hope the horizon folks see your work and bring you on as a tech!

bill
 
I’m so sorry to have asked for a plane. Wish I could repay for your efforts. I certainly could not afford to repay the work you put in. If we ever cross paths I would gladly buy you a beer or two!

I hope the horizon folks see your work and bring you on as a tech!

bill
I'm not sure why you would say you're sorry. Don't read anything into my explanation. It was just my way of bringing you up to speed on what it takes to create a model for RealFlight. It's a long process that beginners have no idea about, so I thought I'd share the process with you, and the other fellow that's interested.
 
I realized this morning when I made the ailerons wider for the Ultra Stick (from my original stick) that I didn't adjust the height of them too, so they were too thin. So I went back this morning and fixed that. I think I have all the changes finished to the original stick for the Ultra Stick so it should be ready to start remapping for all the changes. But I have the other project too, which I stopped working on to work on the Ultra Stick. So this is a good time to put this project on the back burner and go back and finish the PX-39.
 
I thought I'd give one more update before I start working on the PX-39 to finish it up. I forgot I needed to redo all the pivot points for the Ultra Stick so I went back and did that this morning. So now it's really ready to map. The things left to do on the Ultra Stick is the mapping and then I need to finish the collision mesh for it. Sadly the project I started with didn't have a collision mesh. But things are moving along nicely.
 
I thought I'd give one more update before I start working on the PX-39 to finish it up. I forgot I needed to redo all the pivot points for the Ultra Stick so I went back and did that this morning. So now it's really ready to map. The things left to do on the Ultra Stick is the mapping and then I need to finish the collision mesh for it. Sadly the project I started with didn't have a collision mesh. But things are moving along nicely.
👍
 
I just finished the physics for the PX-39 so I thought I'd give an update on the Ultra Stick. I've been thinking about adding a little more detail to the Ultra Stick so I'm going to put off the mapping untill I finish that. I'm going to add the servo linkage to the elevator and rudder and the servos and linkage for the ailerons and flaps. (just to spruce it up a bit more)
 
I just finished adding the elevator and rudder servo linkage. I reworked the conrol horn for those servos so I want to go back and add the new horns to the aileron and flap servos too. The new horns look like the real plane instead of the horns I normally use.
 
I went back this morning and added the new control horn to the ailerons and flaps, so the servo parts are done. I'm going to set back for a bit and see if there's anything else I want to add before I map it. But I have some errands to run and grocery shopping to do, so I'll stop for now.
 
Back
Top