wings 3d

my plan.....

this was my plan for the skyhawk......my dads plane.....i was going to copy the colorscheme.....we had lots of fun in this bird. its now a trainer at an airport 30 miles from me. dad had to quit flying.....cateracts....and heart problems.....thus models.
 

Attachments

  • n20472.jpg
    n20472.jpg
    46.4 KB · Views: 12
  • 472-2sm.jpg
    472-2sm.jpg
    51 KB · Views: 8
  • 472-3sm.jpg
    472-3sm.jpg
    53.3 KB · Views: 10
You should look in to Flight Sim 9 and the AVSIM Flight 1 Cessna 172R Skyhawk add on pack that will give you a fully modeled cockpit and better scale flying.
As it stands you model is just a shell so not much of a interior will be seen. You can all way add a instrument and seat and other stuff. With clear windows you'll be able to see it. I got board and took the modified fuselage to your plane in the wings file I sent you and touch it up as a hollow shell see this post. https://forums.realflight.com/showpost.php?p=173694&postcount=15

Oh and I also noticed that you started your model facing he wring direction in wings.. You can combine it all and flip on its Z axis to get it like it need to be. Do this be for exporting. But you'll have to rename all the parts again after separation
 
i hope you meant the y axis.......otherwise my model would be upside down......i rotated everything as a whole in y.....then seperated them an renamed them.....and thanks for junking out my fuselage.....probably the only part of my work that will be in realflight....and you must have a little secret for smoothing out my fuselage your not sharing.....or dont want to share. im at the point right now i dont care if i ever finish it after reading this post of yours.....just keep the whole plane......donate it to rf for a junk plane for sale.....cheap....for your ap objects. :mad:
 
Last edited:
Rotating your plane after Combining the parts 180 degrees on it Y axis will change the direction it is facing on the work area or SCENE.

FLIP ( in body or full object mode ) alone the Z axis will give you the same result but with a little difference. The difference is, Flip will take all the verts, polys, and lines and reverse them from end to end if done allonge the Z axis or top to bottom if done along the Y axis or side to side if a long the X axis.

In the picture example the Mighty Wizard snow man is facing forwards and levitating the sacred Ha-Butoo talisman ( the cone ) off to his right, but after consulting a panel of your critics ( the grand kids ) they think the scene would be more dramatic if the mighty wizard was facing the other direction so you can see his really cool flowing robe. So now you see what will happen if you simply rotate the snow man compared to flipping him. This will savesyou a lot of time not having to reshape the left and right arm and change the way the head is pointing.

But flipping a model might mess up things like, what side the Radio is on the instrument panel inside of a plane and all that. It is just another way of doing things..

For Model planes to work right when exporting out of wings the Plane NOSE must be Facing along the Z axis and in the opponent direction that little blue arrow is ( z Axis ) in the bottom left corner. So if you rotate your scene around you notice the blue arrow and the noes will point to each other, or away from each other as the scene goes 180 around.
 

Attachments

  • WIZZ.JPG
    WIZZ.JPG
    75.3 KB · Views: 13
Last edited:
My secret is time.

My secret for making the plane look smoother is TIME TIME TIME and did I happen to say time in that list of secrets. There is a Wings3D Manual, although it is out dated it still explains the basic, and a Wings3D forum where I just read post and try to pick up tips.

Take you time. Rotate the model about when view small area after you make any changes. Follow the lines down the fuselage ( or object ) with your eyes while looking at the object from different angles. Just because the side of the object looks good form the dead on sideways, rotate the object 45 degrees with your mouse again while looking at small area at a time. If that area looks good zoom out, select a new area a little father down the line and zoom in and rotate it around again.

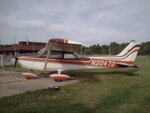
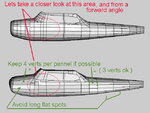
This is he file you sent me and I sent you back. The wings and stuff are turned off and I duplicated your fuselage up above and made some simple changes for you to look at and study. The side view look alike but you can see where I added more loops going around the fuselage to get rid of the LONG FLAT RECTANGLES. Thay look bad in RealFlight.

He bigger picture is looking at an area of your fuselage and my the modified one from the front and at an angle.

1. ( number one's ) avoid long flat areas. If these area will have a lot from twist in them from end to end. Add more loop lines that goes all the way around the object to help break up light reflection and adjust the new line and verts if needed. ( see #2's )

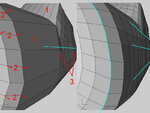
2. Here I can see you added some lines in to help made the curve of the cowl look smoother. The bad part of just adding lines in the middle of a flat area is the new line then self will just be as flat the first area it's self. After adding more line in the middle of other surfaces to make the look better you need to be adjusted them in or out to give a rounder appearance. On your cowling. The verts I highlighted should be moved out a bit on the X axis to give a more rounder look. ( X and Y up a bit as you go up and around the top of the cowling and X and Y down a bit as you going around to the bottom of the cowling )

The blue line are SIGHT lines ( how I think the lines should be as I'm modeling )

3. If you look down the side of your fuselage it looks like some major Hail damage. Panels are pushed in to different depth. ( making light reflection look bad ) Remember this is a 3d model. After adjusting line forwards and back, top to bottom, you still might have to adjust them from left to right as well. Turn the wings and other parts off, and look straight down at this area.. Even in the other fuselage you can see My line are not true, but getting close.

That shell I just did was even more small adjustments. 11 streight hours last night. My eye where killing me .
 

Attachments

  • ED0023.JPG
    ED0023.JPG
    86.1 KB · Views: 19
  • ED0024.JPG
    ED0024.JPG
    89.9 KB · Views: 12
you got Mail ED hehehe


EDIT

Funny picture and caption removed. Did not mean to offend any one.
 
Last edited:
rf planes....

im done asking for help with rf plane design......im done with the forums as well......i will learn it the best way i can......i dont need **** from folks like the above giving smart remarks in every other post i make.......
 
I'm sorry. What did you mean by
edmoor said:
I've only posted 4 times in this thread. It's interesting to look at your post immediately preceded by my post in 2 of those cases. Reading through some of this thread, you threw in the towel 4 times that I saw. Personally, I think you're using me as an excuse to quit again. Not to mention your being short-tempered, and the salty language.
 
Ed,

I think you better re-read this whole thread. Nothing Jeff said was rude or off base, you on the other hand just seem to have a problem with him.

Are you trying to blame Jeff for quitting again?

You have made good progress, keep going.

Thicker skin.
 
Last edited:
Back
Top