uncle twist
Well-known member
Thank`s PilotAt6, it`s getting there. slowly but surely..UT … Just got to say ...WOW !!!
")
Thank`s PilotAt6, it`s getting there. slowly but surely..UT … Just got to say ...WOW !!!
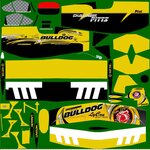
I haven`t even looked into the flying wires yet Andy, thanks for bringing to my attention, where are they on the map.??? here`s a pic. of my map at this point.....Looks good UT. Question though. I’m seeing some of the mounts for the rear stab flying wires are yellow while some are black. Is that an issue with my mapping? I thought I remembered mapping those separately. Is that not the case? I’ll look tonight when I get back to it as well.
Ok, you’ve got the older version. There’s been a few changes to the map, but shouldn’t be anything that will effect what you’ve done so far. To the best of my knowledge, the front of the cowl May be different in size, and a few small parts like control horns and the tail gear are different. I’ll try to get you a good copy tonight. You won’t be able to see it on your model yet, but I’ll get you a final version of that very soon.I haven`t even looked into the flying wires yet Andy, thanks for bringing to my attention, where are they on the map.??? here`s a pic. of my map at this point.....
Any chance you can map the outsides of the wheel pants separately, so I can include the graphics on them..??? right now the outsides are stacked on top each other, as well as the insides..???Ok, you’ve got the older version. There’s been a few changes to the map, but shouldn’t be anything that will effect what you’ve done so far. To the best of my knowledge, the front of the cowl May be different in size, and a few small parts like control horns and the tail gear are different. I’ll try to get you a good copy tonight. You won’t be able to see it on your model yet, but I’ll get you a final version of that very soon.
I’ll look into it. Shouldn’t be a problem, but may be scattered.Any chance you can map the outsides of the wheel pants separately, so I can include the graphics on them..??? right now the outsides are stacked on top each other, as well as the insides..???
You need to know which one`s are which, I can find out for you real quit, right now off the top of my head, I believe the bottom ones are the the insides.I’ll look into it. Shouldn’t be a problem, but may be scattered.

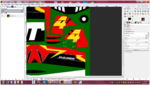
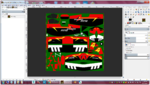
RE: post # 410, I get what you`re saying in the second paragraph and understand completely, the third one is a somewhat confusing to me at the moment, but we can go over that later. My main question is, how do I transfer what I`ve done onto the new template/map, have never done that before.One more thing UT. Here is what the map looks like at the moment. As you can see, nothing but a few small items have been shifted around.
Using one of the select tools, you’ll select the area you’ve already worked on. Right click and choose edit >copy. Right click again and select edit >paste. This will give you a copy of that layer that you can now move around where you want it. Once positioned, you’ll anchor it to the tga.RE: post # 410, I get what you`re saying in the second paragraph and understand completely, the third one is a somewhat confusing to me at the moment, but we can go over that later. My main question is, how do I transfer what I`ve done onto the new template/map, have never done that before.
Sounds good Andy I``ll keep my out for it..When I send you the new model and tga I’ll explain everything then. I hope to have that to you within the next couple days.
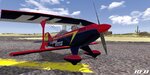
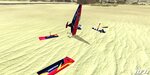
Thanks for the input. I’ve fixed the wheel pant you mentioned after uploading this version. I did notice the tail wheel sinking a bit occasionally, but like you said, I can live with that personally. I think is the fact the collision mesh is so small? The wheel sinking was due to me having to reset X-form to fix a mirrored pivot and not collapsing that modifier. Liars field had the same issue, but that’s also one that if you turn off scenery objects you’ll get holes in the runway that you can’t see when the markings disappear.Main gear right wheel sinking into ground at Flight school HD is fixed, thanks Abaser.
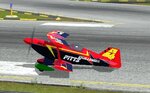
I like the springy flat aluminum main gear "independent suspension appearance" and love the tail wheel spring, awesome detail.
Left wheel pant has no tga color on outside and occasionally tail wheel will bury itself in the tarmac. (only happens in Flight School HD) does not occur in other HD fields. The tail wheel sinking happens only very intermittently, (probably not worth fixing).
Yes I like the way the 40% Pilot Pitts Challenger fly's, fantastic model Abaser.