AMR Monster Stick 150

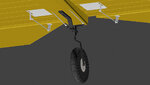
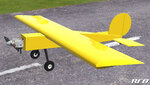
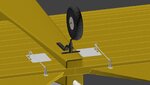
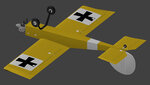
I couldn't start on my project at home today because of the rain and cold so I got to work on the Monster Stick. I did the first pass of the mapping and used that to create a color scheme, so here's a picture for you. Hey, it looks like a Stick. That's the thing about RealFlight you loose the presence that gives you that huge feeling. But the large tires and wheels look pretty good. I haven't done a spec map this is just the basic TGA colors. I'll finish the CS when I can and update the physics with the correct sizes. Right now I'm using a physics file from my 96 inch stick.
 

Attachments

  • AMR Monster Stik 150 13.jpg
    AMR Monster Stik 150 13.jpg
    287.8 KB · Views: 13
I guess I don't understand manufactures. I sent an email to the fellow that did the build thread for their prototype and he fired an email back quickly and said to call him. We had a nice chat and he said he would talk to someone and have them contact me, but nothing yet. I sent one more email to him and ask if maybe there was a manual I could download that might help me, but no reply. I just don't understand why a manufacturer wouldn't give a scale 3 view to someone wanting to model their plane. To me that's free publicity. On well this model isn't as accurate as it could have been with a 3 view. I mean I used a PICTURE of a person holding the plane up as a template but that didn't give me any side or front view. Too bad I really thought I was going to get some help.
 
I'll "settle" for your own skill and intuition any day. I'm sure it will be great.

Thanks! Yeah it's starting to turn out pretty good I've been tweaking stuff to look like the pictures I seen and adding a couple of nice details. See my update next.
 
The weather threw a wet blanket on what I was going to do because most of it was outside. I worked on some other stuff but not what I wanted too. But that was good for modeling I guess because I've had quite a bit of time to model. But I'll admit some of it was really late nights (read an all nighter) and others were early in the morning while I'm having coffee. Anyway I've done a few things to the Monster and I think it's a bit more accurate now, but of course I can't know that for sure. But it does look more like the pictures I've downloaded. One thing I did was rework the VStab the one on the Monster it's more elongated than the one on the plane I got the parts from. I also made the HStab a bit larger and increased the length of the elevator, not a lot but more inline with the pictures I've downloaded. I also lowered the top of the fuselage at the firewall to get a little downward angle on it.

After all that I went back and added the parts the prototype had on the right side of the fuselage. I added a power switch in front and further back a plate with inlet and outlet quick connects for the fuel tank. And below the quick connects I added two charging ports for the receiver and ignition batteries. I also added caps on each of those parts so dirt can't get in. I have a couple of pictures of the new parts so you can see what I mean. I still need to add servos but I may do that after I do the first pass of mapping so I can get the plane flying sooner. It's easy to go back and add servos to the mapping later since they don't affect anything else.

One more thing I did that was lots of work. The engine side view was off, it was a bit too long, so I had to select all the parts and move the necessary areas back some to make it look better. I had also removed the choke and throttle plates from the carburetor to recover some triangles on the last plane it was on so I added them back since on this plane it's easy to rotate the view and see them. That's probably some detail that won't be seen much but little things like that look good when you rotate the plane around in the RF editor. So now it's time to remap everything I've changed and map the new parts I've added. But I do wish the weather would clear up I need to get that stuff done.
 

Attachments

  • AMR Monster Stik 150 15.jpg
    AMR Monster Stik 150 15.jpg
    107 KB · Views: 10
  • AMR Monster Stik 150 16.jpg
    AMR Monster Stik 150 16.jpg
    65.8 KB · Views: 10
Wow !!! you are putting a lot of detail into the Monster Stick 150, a power switch, charging ports with dust covers, fuel fill/overflow ports, throttle and choke plates on the engine, plus those big beautiful tires and wheels. This will be another great model, thanks Technoid.
 
Wow !!! you are putting a lot of detail into the Monster Stick 150, a power switch, charging ports with dust covers, fuel fill/overflow ports, throttle and choke plates on the engine, plus those big beautiful tires and wheels. This will be another great model, thanks Technoid.

Thanks. I added a bit more detail today I cut the holes in the top of the wing where the wing screws are recessed. I even added a screw at the bottom of the hole so when you look down in the hole in the RF editor you'll see a screw. My screws aren't fancy but you can tell they're screws. I suppose now days with the extra polys in RF-8 I should start adding a slot in the top of the screw. But I haven't started doing it yet.
 
Legoman. Since you're the defacto scale guy how bad would it be if I used normal servos in the wing and elevator instead of the ones turned on their side with just the servo arm sticking out a slot. I don't know why but for some reason I don't care for those. And if I built the plane in real life I wouldn't do it that way. But of course this is a model of a model so maybe I should. Thus the question. Of course I'd like to hear from anyone on this too.
 
I went ahead and seen what I could do embedding a servo in the hstab for the elevator, and the servos for the ailerons will be the same way. I like seeing the servos better than hiding them but the plane was built that way so I suppose I should stay with what they did. Even though if I built the plane I wouldn't do it that way. Take a look at this picture and see if the servo looks okay.
 

Attachments

  • AMR Monster Stik 150 17.jpg
    AMR Monster Stik 150 17.jpg
    66.8 KB · Views: 9
Different way of doing things, but looks okay. Nice to have that kind of room in a hstab.

Yes once you put an airfoil in the hstab you get some room, especially when it's a huge plane like this one. And I'm starting to warm up to the looks, but I do miss seeing the top of the servo and the whole arm. But this does hide the dirty little details better.
 
I finished the servos for the elevator this morning so I thought I'd post another picture for you.
 

Attachments

  • AMR Monster Stik 150 18.jpg
    AMR Monster Stik 150 18.jpg
    125.3 KB · Views: 11
I finished adding the aileron servos this morning. I still need to make the cuts in the wings where the servo arms come out but that's not hard to do. Then I need to add the rudder and tail gear servo connections and it's mapping time. I wanted to be finished with everything this time before I start mapping so I only have to do it once. I was going to release a beta first but decided to save some work on remapping after I added the servos. Since I need to cut holes in the wings and stabilizers where the servo arms come out it made sense to do everything at once and save some time remapping after I added them. Here's a picture of all the servos. Ha. You can only see the plates that cover them but the servo is actually below the surface. I may go back and delete all the hidden servo parts except what I need. All I need is the servo arm and pin since that's all you'll be able to see from the outside. Of course you'd be able to see all the servo parts in the RF editor but I'm not sure that's worth mapping them. I'll overlay all the servo parts so they don't take much room in the CS map but I'd still have to map them.
 

Attachments

  • AMR Monster Stik 150 19.jpg
    AMR Monster Stik 150 19.jpg
    115.2 KB · Views: 12
Legoman. Since you're the defacto scale guy how bad would it be if I used normal servos in the wing and elevator instead of the ones turned on their side with just the servo arm sticking out a slot. I don't know why but for some reason I don't care for those. And if I built the plane in real life I wouldn't do it that way. But of course this is a model of a model so maybe I should. Thus the question. Of course I'd like to hear from anyone on this too.

With out a doubt they will be high torque servos. And one for each elevator and two for each aileron rudder I an not sure but there might be two on the rudder in a internal tray. I am at a rally for military vehicles in ga till Sunday so I am light on specifics.
 
With out a doubt they will be high torque servos. And one for each elevator and two for each aileron rudder I an not sure but there might be two on the rudder in a internal tray. I am at a rally for military vehicles in ga till Sunday so I am light on specifics.

No problem I'm cool I just didn't want to add the servos the way they did, but it's their plane so I figured I better do them like they did. And yeah high torque servos.
 
I added the rudder pull-pull connections tonight and the hstab mount tab with screw. The hstab is like the wings it has a tube running though it and is removable. I still need to add something where the rudder wires enter the fuselage. The mounting tab for the wing is on the bottom and I still need to add them before mapping. Ha. Lots of little details to make it look as much like the kit as I can.
 

Attachments

  • AMR Monster Stik 150 24.jpg
    AMR Monster Stik 150 24.jpg
    106.2 KB · Views: 6
All of those small details will add up to a really great model, and with "Technoid's flight physics" applied to the Monster Stick 150, it will become absolutely incredible, I am looking forward to flying this model.
 
I added the servo connections for the tail wheel this morning and did several tweaks here and there to stuff that wasn't quite right. I also added the wing mounting tabs to the bottom of the wings. Now I need to model one of those covers they make to put where a servo wire goes though the fuselage and add them to the rudder and tail wheel wires. Then I'll be finished and can start mapping. It will be nice to get that finished so I can do some physics and finally get to fly it. Here's a picture of the tail wheel servo wire connections.
 

Attachments

  • AMR Monster Stik 150 25.jpg
    AMR Monster Stik 150 25.jpg
    103.9 KB · Views: 13
Back
Top