You are using an out of date browser. It may not display this or other websites correctly.
You should upgrade or use an alternative browser.
You should upgrade or use an alternative browser.
CH-54 / (S-64) Skycrane -- AKA my very second 3DS Max project.
- Thread starter mwilson914
- Start date

mwilson914
Well-known member
I have seen numerous pictures around the net of that Skycrane with that paint scheme, but for some reason I don't recall ever seeing that organic shaped water tank before.
Maj. Numbskully
Well-known member
matt
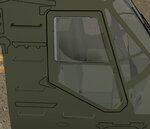
would it be possible to change the side windows on the door? .....I'm planning to bump the door frames and cant get them to line up and still have room for the hinges and the handles
it only need changes to one side
the top window can stay the same size but just needs to be shifted back a little
the bottom window can stay where it is but just needs to have the green areas removed so its a little smaller front to back , height is just fine on both
..in a nut shell the glass needs to be where you see red I can send a tga with the door outlines if you need it
Attachments

Last edited:
mwilson914
Well-known member
I will see what I can do. I am on-call this week and will be working in about an hour and a half from now until Tuesday morning. I hope to get a few hours of sleep then, but most of my week is going to be like this. I was supposed to have a few hours sleep before I work tonight, but the kids, phone and neighbors decided for me that it is better to not sleep at all whatsoever.
Maj. Numbskully
Well-known member
BTW ....my est. time till completion is way off!! 
for some reason lately when I go back to layers I have previously worked on they are suddenly corrupted and having to redo things
well I can't really say "suddenly" as some are ones that I have not looked at in weeks or more so not sure just when they got corrupted ... PC crashes , power outages, kids doing magical things to the PC when I go get coffee , new EA's etc. has also led to lost work that had/has to be redone ........$%@!#T%^& frustrating
Last edited:
mwilson914
Well-known member
BTW ....my est. time till completion is way off!!
for some reason lately when I go back to layers I have previously worked on they are suddenly corrupted and having to redo things
well I can't really say "suddenly" as some are ones that I have not looked at in weeks or more so not sure just when they got corrupted ... PC crashes , power outages, kids doing magical things to the PC when I go get coffee , new EA's etc. has also led to lost work that had/has to be redone ........$%@!#T%^& frustrating
I understand all those things maj! I finally have a battery back-up surge protector for my PC and that should help alleviate lost work from power glitches from our regular high winds throughout winter.
I wish you good luck. I will end up completing my shuttle on my breaks this week and maybe on my days off this weekend if I don't get called out.
Norton
New member
Yep, I've had a monster APC back up for years! I only plug in the CPU, monitor, modem and router. Everything else is plugged into the surge side.
It keeps me going for about a hour during a blackout. (Running hard)
Of coarse my laptop has it's own battery and if need be I can shut down the desktop and save the power for the modem and router. Go all night like that....
Years ago, power outages were really bad in my town. Not so bad now.
Got to love those buggers.
It keeps me going for about a hour during a blackout.
(Running hard)Of coarse my laptop has it's own battery and if need be I can shut down the desktop and save the power for the modem and router. Go all night like that....
Years ago, power outages were really bad in my town. Not so bad now.
Got to love those buggers.
Last edited:
12oclockhigh
Banned
There is a great article on the skycrane in this months Flying Magazine. Wow... I think the pictures are great and could be of the RF Model. If you can't find on-line... let me know and I will scan and e-mail it to you.
mwilson914
Well-known member
There is a great article on the skycrane in this months Flying Magazine. Wow... I think the pictures are great and could be of the RF Model. If you can't find on-line... let me know and I will scan and e-mail it to you.
I found it. Thanks for mentioning this article.
http://www.flyingmag.com/aircraft/helicopters/erickson-air-crane
Ghost129er
Active member
Major, that detail on the chopper has left me speechless, good job!
Maj. Numbskully
Well-known member
I have not posted any update screenys in a while
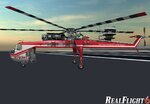
If you are referring to the red and white skycrane photos I posted at the top of this page
they are a side by side comparison of KEs skycrane and the RW bird it was derived from ........I had nothing to do with that
If you're talking about the refrence photos that I posted to show matt were I need the glass shifted to .......................you aint seen nothing
Last edited:
mwilson914
Well-known member
I have not posted any update screenys in a while
If you are referring to the red and white skycrane photos I posted at the top of this page
they are a side by side comparison of KEs skycrane and the RW bird it was derived from ........I had nothing to do with that
If you're talking about the refrence photos that I posted to show matt were I need the glass shifted to .......................you aint seen nothing
Did I ever shift the glass? I don't remember now. Let me know if you are waiting on that.
Maj. Numbskully
Well-known member
No you did not ..yes I AM(But I have done some non-related work on it......IP mostly )Did I ever shift the glass? I don't remember now. Let me know if you are waiting on that.
Ghost129er
Active member
Whoops
Whoopsie, sorry about that, but looking forward to that skin your talking about!
Ghost
Whoopsie, sorry about that, but looking forward to that skin your talking about!
Ghost
mwilson914
Well-known member
No you did not ..yes I AM(But I have done some non-related work on it......IP mostly )
Maj,
I have hardly had time for myself to do anything lately. I really need to get moving on stuff including getting the window changes on the skycrane for you.
During a restroom break I managed to come across this tutorial for Photoshop.
http://www.psdtop.com/blog/designing/realistic-denim-texture/
I have never made my own brushes nor used the pen tool to create a path for brush strokes. Seeing how they did the stitching makes me think of ways of doing rivets much easier. Also the tutorial as a whole could easily be applied to fabric on seats, seat belts, or any other fabric texture on an aircraft. Just thought I would share this tutorial I found. I really want to get the tutorial in the Photoshop Creative Magazine issue 82 "Creative Composites". Learning how to apply cloth texture on the frog would help with many other texture applications on curved surfaces. I already know how to warp and distort selections to simulate 3D effects, but not in the same level as that tutorial. I plan on buying issue 82 as a back issue from the publisher in the UK.
I thought of ways I could apply tile texture to the shuttle from scratch. This would help avoid any copyright infringement issues with other projects as well for paid work.
Maj. Numbskully
Well-known member
Actually the way they did the stitching
seems more involved than the way I and others are already doing the rivets
the time involved is not really in making the rivets themselves but in placing them in the correct place and the to get them to line up piece to piece where and if the cross different panels
and really that would not change using the extra tools in that tut
I could save a lot of time just slapping down a generic rivet pattern
but I like to try to keep the rivets size ,spacing and locations accurate and thats where the time goes
As far as texturing fabric and other materials.............
I've had good success using both photo texturing (most of the time) and creating my own , as well as a hybrid of both
when you get that issue /tut please share
until then I need to rely on jeffs excellent (so far) mapping techniques to avoid distortion .............but we'll take any help we can get
Last edited:
mwilson914
Well-known member
...something is actually happening with this project again.
mwilson914
Well-known member
YIPPEE!!!!!!!
(Hopefully I spelled yippee correctly.)
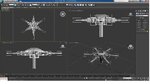
So, I am in a much better mood now. I found my old scale head in a .max file in an old Yahoo email I sent to Oneeyejack a LOOOOOOONG time ago. Most of the skycrane had severe deformations and several ares were so severe that they looked like broken glass (file conflict with older version of Max.) The AWESOME news is my scale head looks to be in perfect shape!!!
Now this scale head takes up a lot of pollies so I don't know if I can use it as-is, but I will find out soon enough. Maybe the poly count on this scale head is close to the current RC style head and I'm in the clear. If I want to make my own custom blades and I don't have enough polys, then I could make a separate model to upload to the swaps such as a brick/cinder block or a no. 2 pencil with a nice set of heli blades which can later be used on the Skycrane. People will have to import both models to get the complete package, but my ratings are disabled, so whew!
The KE blades may work on this beast and I will find out eventually--soon enough.
(Hopefully I spelled yippee correctly.)
So, I am in a much better mood now. I found my old scale head in a .max file in an old Yahoo email I sent to Oneeyejack a LOOOOOOONG time ago. Most of the skycrane had severe deformations and several ares were so severe that they looked like broken glass (file conflict with older version of Max.) The AWESOME news is my scale head looks to be in perfect shape!!!
Now this scale head takes up a lot of pollies so I don't know if I can use it as-is, but I will find out soon enough. Maybe the poly count on this scale head is close to the current RC style head and I'm in the clear. If I want to make my own custom blades and I don't have enough polys, then I could make a separate model to upload to the swaps such as a brick/cinder block or a no. 2 pencil with a nice set of heli blades which can later be used on the Skycrane. People will have to import both models to get the complete package, but my ratings are disabled, so whew!
The KE blades may work on this beast and I will find out eventually--soon enough.