Douglas DC-3/C-47 Skytrain

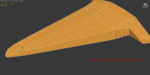
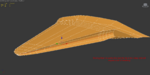
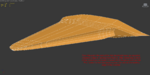
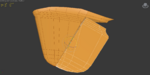
I did get the email but seeing the pics the solution should be to connect the top and bottom verts. Select all of the edges from root to tip and follow the tut I made for sealed hinges. The new edges added should follow the contours as expected. I will check this in the morning but if the verts line up over each other I'm sure it will work.
 
Well I forgot I left the computer running all day so I decided to check this out tonight. As I thought making the vertical connections first allows the new lateral edges to follow the contour. I left you some shots.
 

Attachments

  • 1.png
    1.png
    71.1 KB · Views: 15
  • 2.png
    2.png
    81.2 KB · Views: 14
  • 3.png
    3.png
    64.5 KB · Views: 15
  • 4.png
    4.png
    87.2 KB · Views: 15
  • 5.png
    5.png
    93.7 KB · Views: 15
Last edited:
Thanks Boof. I think my problem is I want to be too precise where it doesn't matter. I would like there to be a way to get those curves exactly right at the tip and such where eyeballing it is really good enough.
 
I have to chime in here with a little comment. I don't think you have the shape of the TE of the stab / LE of the elevator correct. It should not narrow up towards the root. It should be a nice even taper from the fuse out to towards the tip of the stab. The attached picture clearly shows an even taper.

Also looking at your screen shots from behind the elevator looking forward, the leading edge of your fillet is actually a "bulge" rather than a nice concave flow from the stab into the fuse.
 

Attachments

  • c-47-elevator.jpg
    c-47-elevator.jpg
    95.7 KB · Views: 21
I have to chime in here with a little comment. I don't think you have the shape of the TE of the stab / LE of the elevator correct. It should not narrow up towards the root. It should be a nice even taper from the fuse out to towards the tip of the stab. The attached picture clearly shows an even taper.

Also looking at your screen shots from behind the elevator looking forward, the leading edge of your fillet is actually a "bulge" rather than a nice concave flow from the stab into the fuse.

Thanks. The picture is very helpful. Noticing how the real thing appears to be hinged, does the elevator actually protrude up a bit in the front when the elevator at the rear is down (and vice versa)?
 
Thanks. The picture is very helpful. Noticing how the real thing appears to be hinged, does the elevator actually protrude up a bit in the front when the elevator at the rear is down (and vice versa)?

Yes it does. The hinge center line is not at the front of the elevator, instead set back a ways (thus moving the front up or down when the control surface is deflected) I tried to find a few pictures to , if you look close you can see it.
 

Attachments

  • D300-2008-11-01_031.jpg
    D300-2008-11-01_031.jpg
    171.1 KB · Views: 17
  • 3821378206_be108d3190_z.jpg
    3821378206_be108d3190_z.jpg
    94.8 KB · Views: 12
  • p1.jpg
    p1.jpg
    154.2 KB · Views: 14
  • osh-jeremy-lede-620.jpg
    osh-jeremy-lede-620.jpg
    95.6 KB · Views: 9
  • 3100246055_d3ee96960a.jpg
    3100246055_d3ee96960a.jpg
    156.7 KB · Views: 9
MR, if you want, I can take a couple closeup pictures of the elevator hingeline. It's actually close enough to touch (though I won't). Let me know.
 
Yes it does. The hinge center line is not at the front of the elevator, instead set back a ways (thus moving the front up or down when the control surface is deflected) I tried to find a few pictures to , if you look close you can see it.

Thanks PPlace. I can indeed see it. :D
 
MR, if you want, I can take a couple closeup pictures of the elevator hingeline. It's actually close enough to touch (though I won't). Let me know.

Sorry Jeff. I honestly thought I had responded to this. The pictures PPlace has are enough for what I need for this. Thanks very much for the offer. :)

I redid the profile of the horizontal stabilizer and elevator. I also worked on the flow at the front edge of the horizontal stab. The Elevator was cut to make way for the hinges and the hinges were added to the horizontal stab.
 

Attachments

  • ElevatorHinge001.jpg
    ElevatorHinge001.jpg
    186.7 KB · Views: 24
Actually he will need smoothing groups. The dark stuff along the te of the elevator is a shading error.
 
So good you don't even need smoothing groups! :)

Thanks Fly. :)

Actually, I have been holding off on smoothing groups for anything at this point because I know I need to do more cutting and such, and I'll just have to redo it. I am happy it looks as good as it does without them.
 
Plodding slowly along, I got the rudder cut out today. I still need to hinge it properly. The hinging is similar to the elevator.
 

Attachments

  • DC3Rudder001.jpg
    DC3Rudder001.jpg
    448.1 KB · Views: 19
I got a chance to work a little more on this. I put in the rudder hinges. However, when the rudder is rotated it binds against the vertical stab, especially at the bottom. You have to slide the rudder quite far back leaving a big gap to avoid the problem (I did that some here but not enough). Does anyone know how the real plane dealt with this problem?
 

Attachments

  • RudderHingedProb001.jpg
    RudderHingedProb001.jpg
    184.5 KB · Views: 17
Back
Top