
You are using an out of date browser. It may not display this or other websites correctly.
You should upgrade or use an alternative browser.
You should upgrade or use an alternative browser.
Flying Dragon R-3D
- Thread starter abaser
- Start date


Boof69
Well-known member
Nice man. I actually like it when things come together at the end.
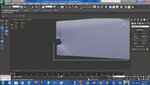
For default renders the environment background is black. If you want to make it a little lighter: Press "8" on the keyboard a box pops up. Go to the "Color:" and change it to a lighter grey. The detail will show a bit better.
For default renders the environment background is black. If you want to make it a little lighter: Press "8" on the keyboard a box pops up. Go to the "Color:" and change it to a lighter grey. The detail will show a bit better.
abaser
Well-known member
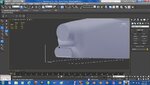
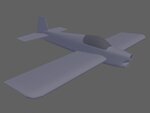
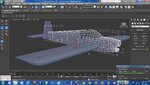
This mornings progress. I like the wing look, but gotta figure out hoe to make it so that I can keep it. The method I used to get the radius around the tip left me with faces that I haven't figured out how to get rid of. Basically, the wing tip, from TE to the first radius edge is unattached to the wing itself.
Anyway, poly count is now at 3164.
Anyway, poly count is now at 3164.
Attachments

Madratter
New member
In terms of the faces, I'm not sure what you would want to get rid of.
In terms of attaching to the wing, there is an attach command.
Select the wing and then take the second tab where you would select modifiers. Instead look at the various options that show up for the wing. One is an attach command. Then select the dialog box next to the command. You can then select whatever that out object is and attach it to the wing. Once attached, you can combine vertices, do your smoothing groups, etc.
You may well know all the above. I'm just writing it out in case 1) it does happen to be useful to you, or 2) it might be useful to someone else.
abaser
Well-known member
My wing started out flat on the end. I connected verts at the thickest point of the airfoil to create a hinge point. I then extruded the face at the leading edge along that edge a couple times to create the corner. Once I made the turn, extruded again along that end face to thetrailing edge. Scaled to follow the wing profile. In doing so, the last extrusion left the original end face of the wing, as well as the back face of the extrusion. In short, the end cap has double faces and verts where it begins to round over. I can't bridge because two of the faces share an edge. My thought is to detach the trouble faces and delete the inside faces from both objects. Then attach them back together and bridge the borders and weld extra verts.
Last edited:
Madratter
New member
Hit alt+x to make the wing see thru. Then in poly select mode click on those unwanted faces until they select then delete them. Now just weld the verts and its a solid object again.
Ever since I discovered I could make objects see through in Max, it has made my modeling so much easier in many ways.
")
Also, Andy, don't forget you can hide and unhide individual faces as well.
abaser
Well-known member
Ever since I discovered I could make objects see through in Max, it has made my modeling so much easier in many ways.
Also, Andy, don't forget you can hide and unhide individual faces as well.
Yeah, I knew you could make it see through, but just not the shortcut.
As for hiding faces, I just found that out a couple days ago. Still haven't got that set in my brain yet.
Fly_electric
Well-known member
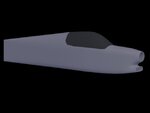
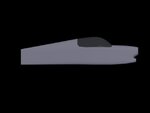
It's looking great Andy.
Are you planning on making the interior structure visible like the pics of the original model?
Are you planning on making the interior structure visible like the pics of the original model?
abaser
Well-known member
Yup. That's the plan. Internal structures, and if polys allow, modeled in tautness between the ribs.
Now, a question for the max guys. I mirrored the wings and h stabs just fine this morning with no problems. Now, when I try to mirror, I only get the result, and the original disappears. What did I do to mess this up? Im using the working pivot, which is showing to be located at 0, 0, 0, and ticking copy along the X axis in the dialog that pops up.What shows up is in the right place, but no original.
Now, a question for the max guys. I mirrored the wings and h stabs just fine this morning with no problems. Now, when I try to mirror, I only get the result, and the original disappears. What did I do to mess this up? Im using the working pivot, which is showing to be located at 0, 0, 0, and ticking copy along the X axis in the dialog that pops up.What shows up is in the right place, but no original.