
You are using an out of date browser. It may not display this or other websites correctly.
You should upgrade or use an alternative browser.
You should upgrade or use an alternative browser.
Gmax and Deep-Exploaration: Discussion Thread
- Thread starter maxkop
- Start date
maxkop
Well-known member
When you export via Deep Exploration you have to setup your materials. You can see the materials under the Scene Tree of DE. To be sure that the export process is running, make sure all objects of your aircraft are referring to the same material; delete every other materials and specifiy in the options dialog of the material the path to your .tga - file. If you've setup DE in the .3ds - export dialog that a new .tga - file is generated you have to overwrite this with your original "uncompressed" .tga - file, cause DE writes by default "compressed" .tga files.
Greets,
Max
Greets,
Max
maxkop
Well-known member
yodummy200 said:whats the point of Deep-Explorer if Gmax can export it to .3ds alone?
Like dhk79 said, gmax cannot create .3ds - files. It's a clone of 3dsmax, but without the capability to create them.
FlyingFish
New member
What happens if my model goes over the 1200 poly limit in the 3ds2kex.exe converter? ( I had 2659 polys)
Ross001
New member
Flying Fish,
Nothing will happen, The .kex will still be generated if the poly count is less than 8000. When you go above 8000 you have to use collission meshes.
It does give you a warning but just ignore that for now. If a kex file is generated under your folder then you can import that into Realflight.
Cheers,
Ross
brentg
Well-known member
When doing a gas motor model, do you have to model the motor in 3ds with the model, or can you use the engine to show option in the editor somehow?, I tried a test but it showed "none" in the option box, I have seen other models in RF that you can change to 2stroke, 4 or electric with this option menu. I tried to search this but could not find any info.
Thanks,
Brentg
Thanks,
Brentg
maxkop
Well-known member
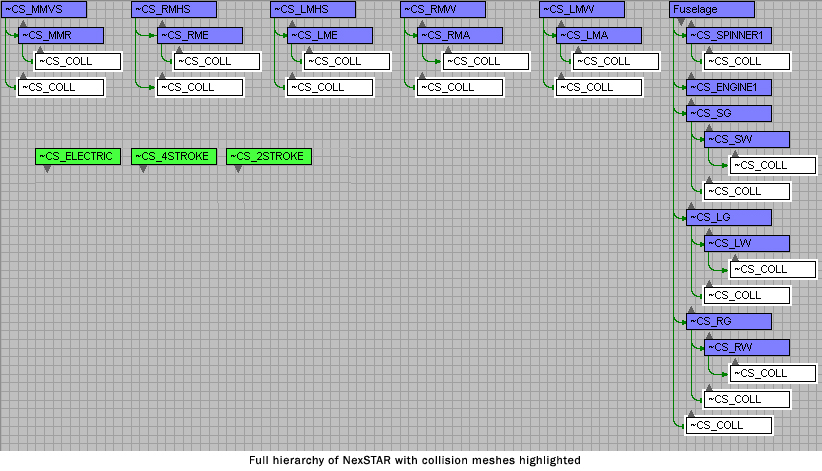
This is an option only available in 3dsmax. Look on the hierarchy image of the Nextar model in the KE - Tutorials. The definition of different motor variants accessable in the Realflight G3.5 editor is made by grouping the different 3D - Model - Components and naming the groups with the ~CS - Prefix.
This is a problem for the .kex - converter. Cause there is no option to distinguish groups from normal 3D - objects.
Greets,
Max
This is a problem for the .kex - converter. Cause there is no option to distinguish groups from normal 3D - objects.
Greets,
Max
dhk79
Well-known member
I disagree here Max,
To get a RC motor to show in RF, it has to be modeled just like any other part of an RC plane and is part of the .3DS file. To use your own words, the motors are normal 3D objects and get linked to the fuselage. The listed names in the tutorial are just so RF will recognise them for what they are, but they are not retrieved from the program itself. If you zoom down real deep ito the NexSTAR example you will find one motor modeled, but not all three. While this motor is a 3DSMAX "group" of objects, you don't have to do it this way.
To get a RC motor to show in RF, it has to be modeled just like any other part of an RC plane and is part of the .3DS file. To use your own words, the motors are normal 3D objects and get linked to the fuselage. The listed names in the tutorial are just so RF will recognise them for what they are, but they are not retrieved from the program itself. If you zoom down real deep ito the NexSTAR example you will find one motor modeled, but not all three. While this motor is a 3DSMAX "group" of objects, you don't have to do it this way.
Last edited:
brentg
Well-known member
So what your both are saying is that you must "model the engine" and put the "~CS_FOURSTROKE or 2 stroke naming convention"of the object under the Fuselage hierarchy. And this will give the options to switch "engine shown" to desired motor? I did a AV for the PT-40 that I switched the motor shown to a OS 4-stroke, I want to do this with the model I am working on also.
Thanks
Brentg
Thanks
Brentg
brentg
Well-known member
dhk79 said:You can do that if the original 3D model has multiple engines modeled. The PT40 has all three possible selections. But the naming convention is ~CS_4STROKE.
Ok, so would you layer them in the engine area of the fuse ?, sorry about the typo, was just typing and not thinking, it's hell to get old

Brentg
dhk79
Well-known member
I think so, but have never really tried it. From what I've seen, if the engines are not selected in the engine to show field you can't see them and they don't effect the model. This way, you could have three of them sitting right on top of each other and each have a different prop spawn point too.
brentg
Well-known member
Thanks,
I modeled a very basic motor and placed it and named it in the fuselage's hierarchy ~CS_4STROKE , reimported to RF, the motor shows fine but there is still none under the "engine to show" option. I was hoping not to model a detailed 4stroke and use the RF model instead, I will keep pecking away at this.
Thanks for your help.
Brentg
Attachments
maxkop
Well-known member
dhk79 said:I disagree here Max,
To get a RC motor to show in RF, it has to be modeled just like any other part of an RC plane and is part of the .3DS file. To use your own words, the motors are normal 3D objects and get linked to the fuselage. The listed names in the tutorial are just so RF will recognise them for what they are, but they are not retrieved from the program itself. If you zoom down real deep ito the NexSTAR example you will find one motor modeled, but not all three. While this motor is a 3DSMAX "group" of objects, you don't have to do it this way.
Perhaps the different motor - 3D - objects (wether there is only one or more for each motor) has to be grouped and are only recognized by G3.5 because they are grouped. That is probably the reason, why this feature isn't working with DE. A group is not a parent - child connection between different objects.
I firstly also thought it's only a naming convention of the motors (~CS_ELECTRIC, ~CS_4STROKE). I've also tried it once in the 3dsmax demo. I was not able to setup different Motor - 3D - Objects accessable in the aircraft editor of G3.5, as long as I haven't made groups out of them and giving them the naming convention from above. Perhaps I've made something wrong and the feature is really only naming specific. Could someone who is still able to run the 3dsmax demo, or own 3dsmax by himself check this? A comment by KE could also help. Different motor variants aren't explained in the KE - tutorials.
I will look in DE if one is able to specify groups.
Greets,
Max
Last edited:
maxkop
Well-known member
I often get PM's questioning different steps in my tutorial (in fact I can't count them any longer). Lately somebody was questioning me:
What is the DOS - Part of windows?
Cause I don't want that somebody feels embrassed here, I will not name the person. Knowing about the DOS - console is one of the basics if somebody is working with windows. Questions like this are showing me, that now a younger generation is sitting behind the screen and I am probably one of the old guys here My first computer was an IBM 3x86 with 33 MHz and 4 MB RAM running Windows 3.10. Today a system can have a Quad - Core Processor with 8 GHz and up to 16 GB of RAM.
First of all, there exists no DOS - System under winxp or vista. While earlier versions of windows like 95 and 98 needed DOS for boot up, winxp only has an emulator console for it which is used to execute and give commands to small programs like the 3ds2kex - converter. It would simply make to much work to program a whole user interface for it. One also says "Windowing" makes no sense here.
One start this DOS console under START->Execute As...->And then type 'cmd'
While in the early times of computers the DOS - Console was the heart of the user interface nearly nobody uses the DOS - console today. System processes like copy or rename a file can be made much more comfortably with the windows explorer nowadays. Especially critical system processes like partioning and boot up options were handeled under DOS. But that's not always the case. Especially when you are working with Linux or Unix you will do much more with the console, although these systems are using a graphical user interface too.
When you start up the console you should be located in your user directory, for example:
C:\Documents and Settings\user>
This command line where you can input commands, which are executed by the computer after pressing the "Return" - Key is also called "prompt". There are existing a lot of different commands for the DOS console. Here are the most important you will need when you want to work with the 3ds2kex - converter:
cd
cd..
dir
Yes, that's all. Only 3, good right?
If you have extracted the KnifeEdge 3ds2kex - converter toolkit on your Desktop, the 3ds2kex converter executable should be located in:
C:\Documents and Settings\user\Desktop\3ds2kex\3ds2kex.exe
So let's change to this directory by typing:
C:\Documents and Settings\user>cd Desktop
You are now located in your Desktop directory:
C:\Documents and Settings\user\Desktop>
With the command 'cd [directory name]' you change to the directory with the name [directory name], in our case Desktop. With 'cd..' you are going back in the directory tree.
To get an overview in which directory you can change and which files you can execute in the directory you are located at the moment, type 'dir'. You get an output like this:
Directory of C:\Documents and Settings\user\Desktop>dir
30.07.2007 11:51 <DIR> .
30.07.2007 11:51 <DIR> ..
30.07.2007 11:51 <DIR> 3ds2kex
C:\Documents and Settings\user\Desktop>
Oh, there's our 3ds2kex directory I've extracted. Let's change to it via:
C:\Documents and Settings\user\Desktop>cd 3ds2kex
And look which files are located in there:
C:\Documents and Settings\user\Desktop\3ds2kex>dir
Directory of C:\Documents and Settings\user\Desktop\3ds2kex
30.07.2007 11:51 <DIR> .
30.07.2007 11:51 <DIR> ..
03.05.2007 12:29 376.832 3ds2kex.exe
23.02.2006 18:01 10.084 license.txt
18.05.2007 11:06 4.753 readme.txt
30.07.2007 11:51 <DIR> Samples
3 File(s) 391.669 Bytes
3 Directory(s), 327.503.872 Bytes free
C:\Documents and Settings\user\Desktop\3ds2kex>
If you now copy your .3ds - file generated by Deep Exploration to this directory, you can start the convertation process via:
C:\Documents and Settings\user\Desktop\3ds2kex>3ds2kex.exe [name of your 3ds - file].3ds, for example:
C:\Documents and Settings\user\Desktop\3ds2kex>3ds2kex.exe Baby Boomerang.3ds
But DOS can more. You can give a command options to modify how it is executed. By typing:
C:\Documents and Settings\user\Desktop\3ds2kex>3ds2kex
usage: 3ds2kex [-l] [-v<N> | -s] [-c] [-?] file.3ds
-l show license agreement and exit
-s suppress license agreement
-v verbose output, N is level 0-3
-c create suplimental data file and exit [see documentation]
-? display help
You get an overview of the options of the .kex - exporter. From there one should be able to work with my tutorial.
If you want to know more about DOS - commands you can find here a nice index.
Greets,
Max
What is the DOS - Part of windows?
Cause I don't want that somebody feels embrassed here, I will not name the person. Knowing about the DOS - console is one of the basics if somebody is working with windows. Questions like this are showing me, that now a younger generation is sitting behind the screen and I am probably one of the old guys here
My first computer was an IBM 3x86 with 33 MHz and 4 MB RAM running Windows 3.10. Today a system can have a Quad - Core Processor with 8 GHz and up to 16 GB of RAM. First of all, there exists no DOS - System under winxp or vista. While earlier versions of windows like 95 and 98 needed DOS for boot up, winxp only has an emulator console for it which is used to execute and give commands to small programs like the 3ds2kex - converter. It would simply make to much work to program a whole user interface for it. One also says "Windowing" makes no sense here.
One start this DOS console under START->Execute As...->And then type 'cmd'
While in the early times of computers the DOS - Console was the heart of the user interface nearly nobody uses the DOS - console today. System processes like copy or rename a file can be made much more comfortably with the windows explorer nowadays. Especially critical system processes like partioning and boot up options were handeled under DOS. But that's not always the case. Especially when you are working with Linux or Unix you will do much more with the console, although these systems are using a graphical user interface too.
When you start up the console you should be located in your user directory, for example:
C:\Documents and Settings\user>
This command line where you can input commands, which are executed by the computer after pressing the "Return" - Key is also called "prompt". There are existing a lot of different commands for the DOS console. Here are the most important you will need when you want to work with the 3ds2kex - converter:
cd
cd..
dir
Yes, that's all. Only 3, good right?
If you have extracted the KnifeEdge 3ds2kex - converter toolkit on your Desktop, the 3ds2kex converter executable should be located in:
C:\Documents and Settings\user\Desktop\3ds2kex\3ds2kex.exe
So let's change to this directory by typing:
C:\Documents and Settings\user>cd Desktop
You are now located in your Desktop directory:
C:\Documents and Settings\user\Desktop>
With the command 'cd [directory name]' you change to the directory with the name [directory name], in our case Desktop. With 'cd..' you are going back in the directory tree.
To get an overview in which directory you can change and which files you can execute in the directory you are located at the moment, type 'dir'. You get an output like this:
Directory of C:\Documents and Settings\user\Desktop>dir
30.07.2007 11:51 <DIR> .
30.07.2007 11:51 <DIR> ..
30.07.2007 11:51 <DIR> 3ds2kex
C:\Documents and Settings\user\Desktop>
Oh, there's our 3ds2kex directory I've extracted. Let's change to it via:
C:\Documents and Settings\user\Desktop>cd 3ds2kex
And look which files are located in there:
C:\Documents and Settings\user\Desktop\3ds2kex>dir
Directory of C:\Documents and Settings\user\Desktop\3ds2kex
30.07.2007 11:51 <DIR> .
30.07.2007 11:51 <DIR> ..
03.05.2007 12:29 376.832 3ds2kex.exe
23.02.2006 18:01 10.084 license.txt
18.05.2007 11:06 4.753 readme.txt
30.07.2007 11:51 <DIR> Samples
3 File(s) 391.669 Bytes
3 Directory(s), 327.503.872 Bytes free
C:\Documents and Settings\user\Desktop\3ds2kex>
If you now copy your .3ds - file generated by Deep Exploration to this directory, you can start the convertation process via:
C:\Documents and Settings\user\Desktop\3ds2kex>3ds2kex.exe [name of your 3ds - file].3ds, for example:
C:\Documents and Settings\user\Desktop\3ds2kex>3ds2kex.exe Baby Boomerang.3ds
But DOS can more. You can give a command options to modify how it is executed. By typing:
C:\Documents and Settings\user\Desktop\3ds2kex>3ds2kex
usage: 3ds2kex [-l] [-v<N> | -s] [-c] [-?] file.3ds
-l show license agreement and exit
-s suppress license agreement
-v verbose output, N is level 0-3
-c create suplimental data file and exit [see documentation]
-? display help
You get an overview of the options of the .kex - exporter. From there one should be able to work with my tutorial.
If you want to know more about DOS - commands you can find here a nice index.
Greets,
Max
Last edited: