Super Sportwin Build

pplace

Well-known member
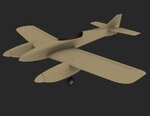
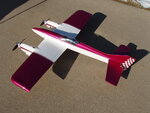
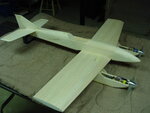
This is Mark Rittinger's Super Sportwin electric twin design that was featured in the June 2011 Model Aviation magazine.

Thanks to willsonman for sending the plans he had already scanned out of the magazine. I set the building plans into more of a regular "3-view" style setp along with adding some of the formers, etc. that were also included on the plans.

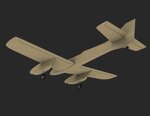
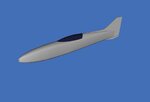
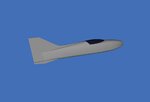
I've begun with the fuse, and also roughed in the v-stab (flat balsa)

Edit: I've left the sharp tip / point of the fuse off for now. I didn't want to accidently mis-select some very small polys while I was working / mirroring the fuse.

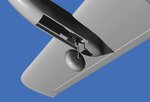
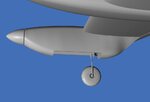
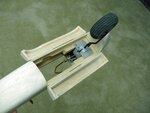
Second Edit: I've taken a couple pictures of the real plane out of it's build thread on rcgroups for reference
 

Attachments

  • SST (1).jpg
    SST (1).jpg
    21.3 KB · Views: 21
  • SST (2).jpg
    SST (2).jpg
    23.4 KB · Views: 15
  • SST (3).jpg
    SST (3).jpg
    19.5 KB · Views: 11
  • P1020524.jpg
    P1020524.jpg
    97.8 KB · Views: 23
  • P1020525.jpg
    P1020525.jpg
    103.1 KB · Views: 24
Last edited:
Did a little more roughing in of the overall shape tonight, starting to take the shape of the plane in that magazine article.

willsonman, I would appreciate your input and help during this project. You are very good at recreating real life model specs and translating them for use in the KE editor (weights, motors, batteries, etc. etc.)
 

Attachments

  • SST (4).jpg
    SST (4).jpg
    30.3 KB · Views: 23
  • SST (5).jpg
    SST (5).jpg
    26.8 KB · Views: 14
Gathering a lot of info already. The easy part is the electronics. Its all laid out for me in the article. The fun part will be how you make the wingtips. The curled ones provided better stability but I've never messed with this in RF. I can try and take a look at what is available already like the seawind. If using E-tracts from Eflite that is easy as well. Weights and speeds are all easily posted. I think I want to really hot rod this thing out so I am looking into different motors and props. CF props will be liter but not necessarily more efficient. Maybe pylon props. Maybe 4S instead of 3S.
 
Cool, glad to hear you've been thinking of some ideas for this project! I appreciate it.

On the plans there were the two different wing tip variations (and listed as "both tips perform well" If you look closely I did go with the curved town tips.....just cuz it looks pretty cool I thought.

As far as the retracts (one of the next areas I was going to model) on the plans it lists Robart model 600 retracts. They are a very simple retract, but Robart supplies dimensional plans / drawings for all their retracts. I have downloaded that specific retract to model and place into the model when the time arrives.

I would be more than willing to let you hot rod it out (as long as it's realistic, which coming from you I know it would be) this thing just looks like a screamer even when sitting on the ground!

The wife and I went to a wedding last night and came back into town this morning. Tonight she's talking about watching a movie....hope I can sneek some time in Wings3D later tonight.

Thanks

Edit: I did get all the control surfaces cut out and shaped the leading edges yesterday afternoon.
 
Last edited:
Awesome. Really the only difference for this application would be the speed of the retract servo and the weight of the retract. Looks like 2.7 oz. each for the nylon 600 retract. Pretty straight forward. I'd need to tweek the physics once it gets to that point. for all the stuff I am figuring. With the construction method described this thing should be SUPER light. I would even say less than the 4lbs 7oz they say for AUW. Still that weight for a twin at 700+ watts will be fun!
 
Modeled the Robart model 600 retracts along with the Dubro super lite wheels. I've also roughed in some of the internal structure of the nacelles, not sure how much further I'll take it.....as most of it's modeled already (see attached pic of real model) I was debating on modeling the actuating rod for the gear, but since the servo is actually mounted directly on top of the gear, there isn't much visible.
 

Attachments

  • SST (6).jpg
    SST (6).jpg
    27.6 KB · Views: 24
  • SST (7).jpg
    SST (7).jpg
    45.2 KB · Views: 28
  • SST (8).jpg
    SST (8).jpg
    33 KB · Views: 17
  • P8080190.jpg
    P8080190.jpg
    61.2 KB · Views: 22
  • P9100299.jpg
    P9100299.jpg
    88.1 KB · Views: 29
willsonman said:
Can we somehow make the battery covers as pods? That way they can pop off on a hard crash.

I'll certainly see where I'm sitting for polys at the end of the build (I've used more than normal on the fuse / nacelles as I wanted them really smooth) I'll certainly keep it in my "plan". It appears the motors would be visible as well if they "popped" off correct? I really don't see a problem with this.

Maj. Numbskully said:
nice retracts pplace

Thanks
 

Attachments

  • P9250315.jpg
    P9250315.jpg
    73.9 KB · Views: 30
I did a few minor items on the SST this evening....mostly just "prep" / cleanup work getting ready for the next stage of modeling: Cutting out the hatches, etc. I like to verify that my shapes are correct / smooth, before cutting items out of them (I like to make sure the final shape is correct, so I don't have to go back and try and make a hatch fit nacelle that I changed the shape of for example)

I exported it quickly over to 3dsMax to do a test render (Hey Maj. :p 
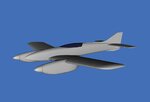
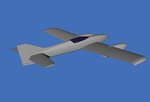
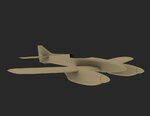
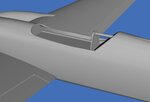
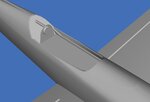
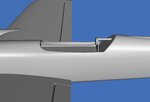
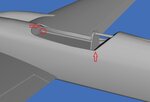
) For the most part I was happy. Fuse, wing, tail surfaces look really nice to me. However i see some shading / rendering issues with the nacelles around the gear doors and along the trailing edge. I'll go back and re-work / clean that up some more and give it another try.

You'll notice I accidentally forgot to export the canopy into Max, I was actually looking forward to seeing that sleek canopy rendered! Next time.
 

Attachments

  • SST (9).jpg
    SST (9).jpg
    179.4 KB · Views: 26
  • SST (10).jpg
    SST (10).jpg
    173.5 KB · Views: 22
  • SST (11).jpg
    SST (11).jpg
    144.2 KB · Views: 14
It seems to me that smoothing/eliminating shadows in Wings 3D doesn't translate over to 3DS Max vey well. I'll have the model in Wings 3D showing no shading issues at all, but in Max, I'lll have shadows, particularly around the bottom aileron corners. I usually end up resmoothing the entire models in Max. It almost seems like placing hard lines in Wings is a waste of time.
 
I understand what you mean to a certain extent, but these issues / areas will be affected, and could use some extra attention.

However certain hardlines (mainly edges) For example: wing trailing edges, control surface edges, cockpit outlines etc. transfer over well from Wings to Max.

Hard edges that DO NOT seem to transfer over are hard lines in the middle of objects. For example: Fuse stringers. On my Gee Bee R2 I tried to have the fuse stringers on the rear half visible (to represent the fabric covering) in Wings they looked perfect.....once in Max it was smooth. At the time Doug did a work around for me to "fake it" This same thing happened on my Laser 200....the actual turtle deck on my real model isn't a nice round smooth surface, but a series of balsa stringers....this did not transfer over to Max and wings.
 
Looking great Dane. I think you may want to look at the trailing edge of the wing just before the ailerons. Looks a little off there too. Close but not "your kind of" perfect. I'm really getting excited about this one.
 
after looking into some different motor choices I think this thing deserves some scorpion motors. 1450Kv up from the stock 1100Kv with a 4S setup should be a mighty... enhancement. :D
 
Hey guys I've sort of been "away" for a couple days. My modem went out the other day at home and it was a couple days before my internet / phone provider could make the service call to come and replace the modem (like a 2 minute job....even if I were to do it!) I checked into the forums a couple times from my work computers when I had a few spare minutes. However I did not have any reference pictures saved for the SST on the house computer so I was unable to do any further modeling on it.

This afternoon the service tech came and replace the modem so I'm back in business!
 
Tonight I worked on the cockpit area.

~I first extended the top of the fuse into / under the canopy
~Then recessed the floor and created the "edge" to mimic the balsa sheeting
~Created the front fuse former (will be painted as a dash panel later)
~Created the "step" for the rear of the canopy to fit flush into
~Created the stringers / structure on the bottom corners of the "floor" in the cockpit
~Lastly modeled the headrest, pad and support tube as per the reference model. (Will decide on pilot figure later depending upon poly count)
 

Attachments

  • SST (12).jpg
    SST (12).jpg
    55.7 KB · Views: 13
  • SST (13).jpg
    SST (13).jpg
    54.7 KB · Views: 16
  • SST (14).jpg
    SST (14).jpg
    51.3 KB · Views: 12
  • PB050377.jpg
    PB050377.jpg
    66.2 KB · Views: 20
You have some interesting shapes in there. I like how the instrument panel is recessed, and the lip on the side. Those ridges are nice! I'd have to think about those areas all evening before I could do them.
 

Attachments

  • SST_(12).jpg
    SST_(12).jpg
    78.5 KB · Views: 25
Back
Top