The Citabria Aerobatic Pro Thread

I guess that means I don't have to then.

But, you know that I will, and I have most of it ready to go ...

LOL, not going too step on your toes, it's just this plane and paint scheme is etched into my brain cells for years.
 
I guess that means I don't have to then.

But, you know that I will, and I have most of it ready to go ...

LOL, not going too step on your toes, it's just this plane and paint scheme is etched into my brain cells for years.

SO, DDawg, what are you going to do?? your comment is open to interpretation. I think Andy has free rein here. Just curious.
 
SO, DDawg, what are you going to do?? your comment is open to interpretation. I think Andy has free rein here. Just curious.

Recreate "MY" Plane.

LOL

I have no problem with him painting the original paint scheme, Heck, for all that matter ... he ask for the decals and pictures, and I sent him what I have from my personal stash, and posted some other stuff in this thread.

But, since he is going for the original color scheme ... and there were two planes made, and the second ... that crashed ... was (rumored) a different color of the same scheme ... well, then I will do my magic.

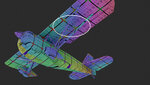
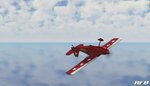
As far as that goes, I have the actual "Flying Model" to my exposal.

I built it almost 19 years ago, masked it out and painted it, and cut hundreds of push pins to simulate rivets. I literally have easily a hundred hours in building my plane. probably more in researching it. Which it is becoming harder to find stuff on it, the older it gets. As only TWO ever were built, and the guy that was restoring the original one built in 1967/68 ... has not had any updates on it's restoration in years.

One of the last, most recent picture of it, is posted several times in this thread.
That picture was from 1989, in Oshkosh, Wisconsin. Even the more extremely rare picture of the "Pro" taking off, being piloted from the Front Seat position ...

Then, it seems to have disappeared off the radar screen. It has been rumored it too has been destroyed.

The last registered owner, Mark Sherman, never replied to any letter I personally sent. In my efforts to get detailed pictures on the restoration project, as to build my "Pro" to scale.

I have done more research on the "Pro" than most.

I still have another "NIB" Balsa USA kit (which I will keep and copy all the parts and the scratch build a modern day version - if I ever stop golfing or riding long enough ... and my last kid moves out ... turns 18 in March and graduates this year ...), and maybe in the 2-seat configuration - just because it is mostly seen in the Red/White, one seater theme - gets boring have a cookie-cutter plane. In addition, I have the smaller electric version that is now no longer availiable, and considered extreme unobtainium.

Research into the history of the Citabria Pro has consumed many years of my life.

Like I said, I am not going to step on his toes ...

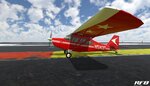
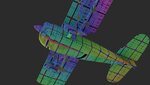
But, I now have a 3D flying canvas ... and I can put my own personal spin on what I feel it should become. I will remain true the original scheme - once .... then I am going to do my flair and take the scheme to that next level.

I do think you read way too much between the lines however ...


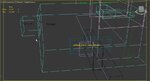
PS. I saw that Andy ... to make it easier and cleaner, these don't bolt on, (Thank god- the wing is a pain enough to put on) they just slide into two holes in the bottom of the wing ... or at least in the BUSA version ...
 

Attachments

  • 12.jpg
    12.jpg
    157.4 KB · Views: 9
  • 20180213_234659.jpg
    20180213_234659.jpg
    207.2 KB · Views: 10
Last edited:
Still goofing around with more testing of the scheme on the Citabria extreme by 211, as I wait ... patiently ... for the pro ...

And now it's off to the driving range ...
 

Attachments

  • ScreenShot1518635211.jpg
    ScreenShot1518635211.jpg
    146.8 KB · Views: 10
  • ScreenShot1518635233.jpg
    ScreenShot1518635233.jpg
    142.2 KB · Views: 7
  • ScreenShot1518635295.jpg
    ScreenShot1518635295.jpg
    86.9 KB · Views: 5
Last edited:
Looking good. Send me your tga ( no need for anything layered) and I'll see if I can make my map close to minimize any changeover efforts.
 
not yet, do your layout ... I have the tools, I have the technology to adapt and make it work ...

the Citabria Extreme by 211 is in 2k by 2k layout ... that alone, will not be worth the effort

as it will not be close. I am totally working generic shapes ... and I will make it work with no issues ...

I will let you see it when I get it cleaned up (maybe)... but I know you will have a better and more workable layout. I am just messing around getting the angles right .. once done, its easy for me to move stuff around.
 
However, I just took a look at this 33% Greg Koontz ACSD by 211 ... A much cleaner layout and a super Decathlon ... closer related to the same bloodline ....

I haven't started on it, this will take a bit of doing to adapt ... but it is a nice starting point ... a lot better than the one I have been wasting time on ... :eek:


Plus I had to cheat to be able to upload it ... remove the RFX ... and resized to smaller filesize
 

Attachments

  • 33% decathlon_211.tga.rfx
    16 MB · Views: 9
  • ScreenShot1518672390.jpg
    ScreenShot1518672390.jpg
    77.8 KB · Views: 8
Last edited:
I had a little time to work on the mapping tonight, so I focused on the bottom of the fuselage. I almost like what I've got going on, but there's still tweaking to be done so that there's minimal stretching. The cowl area has proven to be challenging on this one.

I attached a shot of the wireframe. There you can see just how I manipulate the vertices on the map to allow doing the fuselage in two halves instead of sides and top and bottom. Both have the top area behind the cockpit adjusted, the right has the bottom/cowl area, and neither has in front of the cockpit done yet.
 

Attachments

  • 1.jpg
    1.jpg
    211.8 KB · Views: 11
  • ScreenShot020.jpg
    ScreenShot020.jpg
    131 KB · Views: 13
I had a little time to work on the mapping tonight, so I focused on the bottom of the fuselage. I almost like what I've got going on, but there's still tweaking to be done so that there's minimal stretching. The cowl area has proven to be challenging on this one.

I attached a shot of the wireframe. There you can see just how I manipulate the vertices on the map to allow doing the fuselage in two halves instead of sides and top and bottom. Both have the top area behind the cockpit adjusted, the right has the bottom/cowl area, and neither has in front of the cockpit done yet.

Very cool I can see what you're doing. Could you post two pictures of the wireframe? One before any adjustments and one after you finished so I can see just how you pulled out the shape. But I see what you're doing, looking at the plane and pulling the vertices out to make the image look correct. I actually did that on a smaller scale a long time ago for one area of a plane, but haven't done it since. Thanks for the pictures they really help.
 
The only adjustment I've made to the one on the left is behind the cockpit area. The rest has been untouched. You can definitely see the difference in the render.
 
Drool ... drool ... slobber ... slurp ....

looking great ... this should be fun to paint when finished .... Nice work ...
 
The only adjustment I've made to the one on the left is behind the cockpit area. The rest has been untouched. You can definitely see the difference in the render.

Okay, thanks. That's what I thought but wanted to be sure.
 
One more thing I do is work on one side only. Once I get that one side how I want it, I'll delete the other side of the model and mirror the good side. Saves a lot of time and effort.
 
One more thing I do is work on one side only. Once I get that one side how I want it, I'll delete the other side of the model and mirror the good side. Saves a lot of time and effort.

How does that impact things like "numbering and lettering", doesn't that mean you will have to "mirror" them in painting as well?

Also, is the fuselage going to to chop the vertical fin off, or leave it on? Curiosity kills the Dawg.
 
Last edited:
Once I mirror the other half of the model, I'll have to flip the UV map to keep things correct. Once I'm done, there should be no need to mirror on your end.

As for the vertical stab, it'll be a separate piece on the map. By moving the vertices the way I do, I can't leave it attached to the fuselage. It just makes a mess of things. I can however place them real close to the fuselage to make lining things up easier IF part layout allows. I try to use as much area on the map as possible and make the parts as big as possible to get the highest resolution from the tga.
 
I had to ask, as I am curious in the process on the laying out of the puzzle piece process. I have seen many approaches to this over the years ... some work great, and others ... well ... not so great.

I haven't seen to many use what I see your doing and it is intriguing.


Sidenote: is that the Avia B-534 I see in your Avatar?
 
Last edited:
Not many do it because it's time consuming. What I did last night took about an hour and a half and 80% of that time was spent on the cowl area. The front of the cowl will have to be separated due to the insets but that's no big deal. Also, I'll try and line my texture up as best as I can so if graphics run from one part to another is easier to do and there should be no issues with scaling either.
 
Ps ... in case anyone is interested, I did my first AV mod and a couple of CS for it, posted in the swap pages ...

Warning, this is an aerobatic slope glider ... and exist in real-life ... I own one ...
 
This project is temporarily on hold. I've had this issue for quite some time now, but it's making the mapping process a nightmare. Whenever I move the scene in any way, the model will disappear and only show the bounding boxes. It does it while modeling as well, but for some reason, it doesn't seem to be as big of an issue. I have a bad feeling it's got something to do with my dinosaur of a PC and might not be feasible to fix. If that's the case, I'll do what I have to to deal with it and finish.

What you're looking at in the attached pic is the spinner, fuselage, and right wheel pant/wheel. You can see how trying to position the model to select a specific poly that's pretty small can be frustrating......and I've got a few of those.
 

Attachments

  • ScreenShot021.jpg
    ScreenShot021.jpg
    91.4 KB · Views: 9
Back
Top