Designing Airports - Tips and Tricks

Photo Field - Next Steps

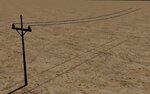
I finally got the photos I took last September stitched into a 360x180 panorama. :D After struggling with Hugin and it's tools and being unsuccessful, I found the free Microsoft Image Compositing Editor (ICE) and it stitched the whole scene together in a few minutes! It took trial and error to get R6 to load the panorama image, starting at ~26,000x13,000 and ending up at ~6600x3300 without getting a memory error and then it loaded fine.
(The pano and raw images are here:
http://www.pbase.com/jghetzler/image/143320444 )

I used a Canon DSLR with auto-focus off, manual fixed exposure and fixed white balance at 28 mm focal length in vertical shots. As you can see, I cheated on the cloud-less sky and still need to fix that and the tripod shadow.

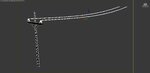
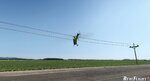
So, now I am in the airport editor and trying to add a simple object: the windsock. I want to add it to the photo approximately where the one is in the photo, but I am unable to get the photo and the edit objects in the main view. Is there a trick here? The trial-and-error method with dragging the windsock a little and using the pan camera is very slow and imprecise.

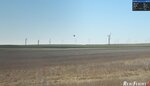
What steps do you guys typically do on a photo field? I'd like to set the photo field's position to the compass, but I don't know what or where in the picture RF uses as the north reference point. Then I can put the sun in for the proper shadows, right? Or is that just for 3D fields?
 
I am unable to get the photo and the edit objects in the main view. Is there a trick here?
Yes, don't use the main view. Use the smaller perspective view for alignment (make it bigger if you need to). Then if you want, go back and edit the pano to remove the image of the object that you are replacing with a dynamic one. To just have an object that aircraft can smack into, use a depth buffer and leave the image as it is.
 
The airport editor allows you to save an entire folder of objects... in fact you can save all the objects to a xxx.rfobjects file type.

Then when you want to use these objects in another airport, you can use the 'File', 'Load Folder' menu item to bring all the items into the currently edited airport. In my case, it is easy to have multiple versions of the same airport without rebuilding all of the objects each time.

It is my plan to have winter, spring, summer and fall versions of my home field. Also nice to have sunny day and overcast days (w/lots of wind) versions.

Using folders, really cuts down on the amount of work necessary to create new versions. Of course you can always just export the root folder and move items as necessary in the treeview structure.

An important clarification to this since it seems many do not understand what is actually going on....

Saving the "folder" of objects does NOT actually save the objects themselves.

It merely creates and saves a list of 3D objects that are installed on your copy of Realflight, which includes Add-ons, Expansion Packs, and user created items...

This file merely lists the hiearchy and object placement data for those objects.

While this is a great convenience for someone working on an airport, you cannot use this technique to "give" other people 3D objects as some have attempted to do.

---

Also depending upon your original definitions, many objects will be "dropped" onto the current surface altitude when imported.

So if you've created a structure, etc. using carefully placed 3D objects... e.g. some in the air, some resting on other objects, etc... once you import the file, those objects will all be lying on the ground.

---

Another tip:

There is a parameter that forces a "conform to ground" placement of objects.... ALWAYS TURN THIS ON for anything you place unless you have an explicit need not to!

Failure to turn on "conform to ground" results in the object not resting on the ground and not being perpendicular to the terrain.
 
Electric Wires

I needed an electric wire to cause crashes on an airport that I am building...

I used the Sod Farm pole and sized it to 400% and changed the inclination to 89 degrees. I used a bunch of the objects to represent about 1/2 mile of electric line. If you use a larger size you can have less objects, but it will be a much bigger object when you are flying behind it.

I used the same object for the support poles. A wire collision object would be very useful. It is so cool when the wire causes a crash, just like it should.
 

Attachments

  • PoleObjectasWire.jpg
    PoleObjectasWire.jpg
    174.9 KB · Views: 50
Last edited:
This is what I have so far. How do you think this should be brought into the sim? Pole and lines as separate object or combined?
 

Attachments

  • render1.jpg
    render1.jpg
    185.5 KB · Views: 36
  • Screen1.jpg
    Screen1.jpg
    317.3 KB · Views: 30
Somewhere, I thought I saw some electrical/phone poles and wiring in another airport... thing is that my pano already has the items built into the photo... so I am looking for collision objects that don't render.

I do like the idea of more elect poles and such... maybe some high tension towers. Windmills that turn?? I am saying these items just because I have a use for them.

As a rendered object, I would have the pole and wire separate, that way any combination of the two could be created. One of the guys at our field had a plane hanging by the muffler on a hi tension line for months before it dropped. It just slid back and forth in the wind.


This is what I have so far. How do you think this should be brought into the sim? Pole and lines as separate object or combined?
 
Last edited:
How do I make them collision objects? Haven't made allot of AP items. I thought depth buffers are used for that purpose.
 
Somewhere, I thought I saw some electrical/phone poles and wiring in another airport... thing is that my pano already has the items built into the photo... so I am looking for collision objects that don't render.

12oclockhigh
you can change objects to render as collision only in the AP editor , but i think you know that already just checking though 8)


doug
 
Doug... I was going to test that theory... but I had not tried it. makes sense. KE: I sure wish we had a search feature on the objects. It is so hard to find things sometimes... I know I have said that before.

Remember folks... create a depth buffers folder and put all your non rendered objects in that folder. You can turn the render on one time at the folder object to place the objects and then turn it off the the folder level when you want a finished product.

The boneyard airport has a phone line group of poles. looks to be about twenty poles or so... double wires. Maybe that is the way to do it... less work for placing the object. 20 is a bit much though.
 
Last edited:
You can make any imported static object a depth buffer ( known as Collision objects before G4.0 or 4.5)
by changing " Render to Depth Buffer Only" to YES ;);)
 
One thing I have against using the object from the bone yard is that the poles will be at the wrong location for my panoramic photo. So when you fly under the wires in a clear location, bam you hit an invisible pole.

I am going to say... pole object and wire object would be best. That way you can place them as they would be at the photo site. You only need to place the poles and run one wire between the poles.
 
Last edited:
This is a 32 foot utility pole object and 200' of electrical lines. They are separate and the wire will come in at the correct height for the pole. Let me know if this works or not 12. I'm still shaky on AP objects.
 

Attachments

  • Evergreen Airport APObjects_AP.RFX
    2 MB · Views: 15
  • ScreenShot1346468775.jpg
    ScreenShot1346468775.jpg
    280.1 KB · Views: 52
That works fantastic. I upsized it a bit to match the pano photo. The pole is great. This is much nicer because less of the view behind the "wires" is blocked.

My guess is that a "true" depth buffer/collision object is just an object painted orange. The orange is for placement ease.

This worked really great thanks... I am responding here so everyone knows. I will post this airport because I had help in a couple of days. It is the Kahl farm in Western Nebraska... great views for flying.

I am looking at adding wind generators as there are many on the horizon. Having those turning in the distance would be awesome.
 

Attachments

  • Kahl_Farm_2012_Windmills.jpg
    Kahl_Farm_2012_Windmills.jpg
    255.5 KB · Views: 36
Last edited:
Modeled Windtowers.

OK I have the moving wind tower objects set for a couple of instances on the horizon.

I am going to photoshop the pano and remove the actual towers and place the models... really look good moving in the distance. There sure are a lot of them. The actual distance to the towers from my photo shoot point is about two miles. I am raising the wind mills up so I don't have such a huge airport... still they have to be too far away to fly back and forth to.

Awesome.
 

Attachments

  • ModeledWindTowers.jpg
    ModeledWindTowers.jpg
    279.1 KB · Views: 34
Last edited:
Trouble matching picture to content?

Are you having trouble with the field's picture and the computer generated content not quite sizing up together. Change the height of the spawn point to be the same as the height of the camera's nodal point when the panoramic picture was taken.
 
Back
Top