technoid
Well-known member
Yeah .. No kidding, Nice Table !Nice Table.
Yeah .. No kidding, Nice Table !Nice Table.
That's definitely a good looking table. My Father and Nephew used to make lots of furnitureThanks. Not a fan of it all being stained, but I wasn’t paying for it either. This is the one I built for myself.
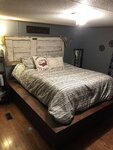
Thanks. I’d like to maybe get into it a little more. I recently made a bed as well and used an old door out of the abandoned house I grew up in for the headboard.That's definitely a good looking table. My Father and Nephew used to make lots of furniture
I like the way you left the door natural. My nephew, Richard, made just about everything in his house (before he died) God rest his soul.Thanks. I’d like to maybe get into it a little more. I recently made a bed as well and used an old door out of the abandoned house I grew up in for the headboard.
Sounds like your pretty busy even during these times ! Your daughter has a pet pig? Wow. That sounds pretty cool actually. Anyways, love that table.Eating....... you’re funny.? More like my daughters softball team got cleared for practice for the first time since fall (he travel team, HS team was cancelled) and that’s a 2 hour drive one way. Add a 4 hour practice in between drives and that’s 8 hours. Then her pig escaped and went to visit the neighbors down the road a 1/2 mile away. Wrestled that thing for almost 2 hours. In the meantime, I threw my back out so I was done for the day.
Sunday started off with a one hour drive to pitching lessons (once again for my daughter), 1 1/2 hours there, then an hour home. Get home and eat only to have to build a kitchen table for a customer. Knocked that out around 10:30 that night so once again I was done physically but did do a little while I wound down from the day.
So, long story short (May be too late for that), I might’ve eaten once or twice this weekend.
So sorry. Sounds like he loved to build stuff. God bless him.I like the way you left the door natural. My nephew, Richard, made just about everything in his house (before he died) God rest his soul.
That's a good lookin' bed ! ! !Thanks. I’d like to maybe get into it a little more. I recently made a bed as well and used an old door out of the abandoned house I grew up in for the headboard.
Thanks. Yes he did and he died too young too. His main job was installing replacement windows but he was one of those guys that could do anything.So sorry. Sounds like he loved to build stuff. God bless him.
We’re trying to do several things in the house like that. My wife loves the rustic look, so rustic it is. The table has several large knot holes and we opted to not sand it. The bench tops and table tops are really smooth wood though so splinters hopefully won’t be a problem.I like the way you left the door natural. My nephew, Richard, made just about everything in his house (before he died) God rest his soul.

I have a 15 year old daughter....... Tap till your hearts content. I’m used to annoying behavior. ?Okay I'll wait but I'm going to tap my foot. <grin>
Great tip, Thanks. and yes, nice wheels !One thing I discovered, and this may be common knowledge, but double clicking an edge while mapping will loop the selection. Works great for creating seams.