
You are using an out of date browser. It may not display this or other websites correctly.
You should upgrade or use an alternative browser.
You should upgrade or use an alternative browser.
Lazy Eight Mk III
- Thread starter technoid
- Start date
technoid
Well-known member
Thanks.. but that's a bit rich for my pocket book. Please buy two and send me one
")
If you install Lazy Eight Mk III on RF 7.5 you'll see the plane is Super Glossy, that's because I've tried to tailor it for RF-X so a person could install it on RF-X and not need to Delete the Spec Map file to get some gloss on it. I'm pretty sure you always do that, is that true? If it is can you import the Mk III again Fresh and Leave the Spec Map file there and then fly it in RF-X and tell me how it compares to Deleting the Spec Map file. What I did was make the Alpha Layer (the gloss layer) of the spec map White so the parts would get as much gloss and RF-X would give them. So I need another opinion on if that works. So if you don't mind give that a try and let me know.
Actually I have not touched the spec map on the Lazy Eight Mk.lll because the gloss level looked okay, but yes I usually just delete the alpha layer only in the spec map to get gloss effect, (not the entire spec map)
I will test RF-X with and without the alpha layer in spec map using a fresh copy and also compare to RF 7.5, sometime tomorrow.
technoid
Well-known member
Actually I have not touched the spec map on the Lazy Eight Mk.lll because the gloss level looked okay, but yes I usually just delete the alpha layer only in the spec map to get gloss effect, (not the entire spec map)
I will test RF-X with and without the alpha layer in spec map using a fresh copy and also compare to RF 7.5, sometime tomorrow.
Thanks for the info on how you handle the spec map it's good to get that info because yes I thought you deleted the file not just the alpha layer. But that's a better way to do it. You don't have to bother with RF 7.5 I just mentioned that mostly to let the other people that's using RF-8 know why the plane looks so glossy for them
First 2 pics alpha channel, next 2 pics no alpha channel.
No alpha channel seems slightly better, but not by much.
I like the gauges.
No alpha channel seems slightly better, but not by much.
I like the gauges.
Attachments


technoid
Well-known member
First 2 pics alpha channel, next 2 pics no alpha channel.
No alpha channel seems slightly better, but not by much.
I like the gauges.
Thanks and I see what you mean no alpha channel is a bit better. I guess I could release two versions, one for RF-8 and one with RF-X in the title. I don't really want to do that but it would allow people to have the best version for RF-X because I think most people don't know how or have the tools to modify the spec map. I sure wish they'd address this issue.
technoid
Well-known member
I'll do the electric once it's finalized. Unless somebody else want to do it.
How about an AMD Threadripper 32 CPU instead of i9 ? (16 core). I've got permission to get a new PC. Then I can run my RF-X. Trying to decide on specs.
I'm not sure when the next mainstream Intel processor is coming out but that's what I go with. I usually get the top processor in that chain. I got the I7 6700K just before they released the I7 7700K but I'm running the 6700K at the same clock rate as the stock I7 7700K so I should get the same performance.
technoid
Well-known member
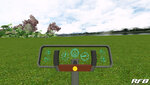
I thought the numbers and markers on the face of the small gauges I added last night was a bit too thin. So I went back and did some clean up work on them and made them 2 pixels thicker. I think they look much better now. Here's two pictures, the first is before the mods and the second is after the mods.
EDIT: I just changed the prop from 18x20 to 20x20 to pick up a bit more on the top end so now it fly's at 130 mph at full throttle. I need to adjust the CG a bit to make it fly level at that speed like it did at 125, yeah I know that's not much more speed but it's where I want the released plane to be. After I get the CG tweaked I'll upload another beta which may be the released plane. Right now I've done everything I wanted to do. But I do tend to think of one last thing to do a few times. Ha!
EDIT: I just changed the prop from 18x20 to 20x20 to pick up a bit more on the top end so now it fly's at 130 mph at full throttle. I need to adjust the CG a bit to make it fly level at that speed like it did at 125, yeah I know that's not much more speed but it's where I want the released plane to be. After I get the CG tweaked I'll upload another beta which may be the released plane. Right now I've done everything I wanted to do. But I do tend to think of one last thing to do a few times. Ha!
Attachments


Last edited:
technoid
Well-known member
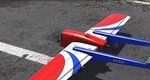
Well there's always one last thing to add it seems. The Mk III had my standard wheels on it which are flat with no details but I wanted to start using the wheels I created for the P-38L so I grabbed them and put them on it. But then I decided to make them a little better so I added a rim detail to the outer edge of the wheel and pulled in the inside hub to make a deep dished wheel. So I guess this will start being my standard wheel.
Here's two pictures so you can see what I added. The first picture is a render of the P-38L wheel, which is what I started with. But the P-38L wheel is flat across and I wanted to add a bit more detail this time. So I added the rim detail on the outside of the wheel and pulled in the center hub to make it a deep dished wheel. I think that added a nice touch to it.
Here's two pictures so you can see what I added. The first picture is a render of the P-38L wheel, which is what I started with. But the P-38L wheel is flat across and I wanted to add a bit more detail this time. So I added the rim detail on the outside of the wheel and pulled in the center hub to make it a deep dished wheel. I think that added a nice touch to it.
Attachments


Well there's always one last thing to add it seems. The Mk III had my standard wheels on it which are flat with no details but I wanted to start using the wheels I created for the P-38L so I grabbed them and put them on it. But then I decided to make them a little better so I added a rim detail to the outer edge of the wheel and pulled in the inside hub to make a deep dished wheel. So I guess this will start being my standard wheel.
Here's two pictures so you can see what I added. The first picture is a render of the P-38L wheel, which is what I started with. But the P-38L wheel is flat across and I wanted to add a bit more detail this time. So I added the rim detail on the outside of the wheel and pulled in the center hub to make it a deep dished wheel. I think that added a nice touch to it.
AWESOME !!! now that is detail.
Fly_electric
Well-known member
Well there's always one last thing to add it seems. The Mk III had my standard wheels on it which are flat with no details but I wanted to start using the wheels I created for the P-38L so I grabbed them and put them on it. But then I decided to make them a little better so I added a rim detail to the outer edge of the wheel and pulled in the inside hub to make a deep dished wheel. So I guess this will start being my standard wheel.
Here's two pictures so you can see what I added. The first picture is a render of the P-38L wheel, which is what I started with. But the P-38L wheel is flat across and I wanted to add a bit more detail this time. So I added the rim detail on the outside of the wheel and pulled in the center hub to make it a deep dished wheel. I think that added a nice touch to it.
Yep, those are the details that make such a difference. The planes at the flying field have wheels with hubs, control horns, push rods, PR clevises, and servos.
May take awhile to make such a detailed part, but it's then available for reuse on that next model...
Nice work technoid!
Ghost129er
Active member
Yep, those are the details that make such a difference. The planes at the flying field have wheels with hubs, control horns, push rods, PR clevises, and servos.
May take awhile to make such a detailed part, but it's then available for reuse on that next model...
Nice work technoid!
For me, RealFlight always has, and always will be an R/C Flight simulator rather than the 'game' it is. I have always found a love and liking to models that pay such attentions to servos, control arms, and the works found in an R/C plane than details of that as in Simulator aircrafts. Sure, you can go crazy with details in real life too but there's just something about those old Hobbico ARF's (like the SkyVista and whatnot) that always have their control rods, servos and such sticking out.
Great work indeed technoid! In fact, if you want, try giving your needles a pivot and attach it to the throttle channel and you have an instant manifold pressure gauge working! Just an idea for anyone who wants at least 'some' needles in their cluster to work.
P.S. Absolutely IN LOVE with the servo, arms and link rods. I think you and I can get along just fine. (
technoid
Well-known member
For me, RealFlight always has, and always will be an R/C Flight simulator rather than the 'game' it is. I have always found a love and liking to models that pay such attentions to servos, control arms, and the works found in an R/C plane than details of that as in Simulator aircrafts. Sure, you can go crazy with details in real life too but there's just something about those old Hobbico ARF's (like the SkyVista and whatnot) that always have their control rods, servos and such sticking out.
Great work indeed technoid! In fact, if you want, try giving your needles a pivot and attach it to the throttle channel and you have an instant manifold pressure gauge working! Just an idea for anyone who wants at least 'some' needles in their cluster to work.
P.S. Absolutely IN LOVE with the servo, arms and link rods. I think you and I can get along just fine. (
Thanks I'm glad you like it. I thought about making the needles move but I'm ready to stop adding details now and release it. But that is a cool feature.
technoid
Well-known member
Got a question for you guys. I want to get rid of the camera shake completely, that may not be realistic but for this plane that's what I want to do. I've played around with the shock mount for the camera but the camera still shakes. In some areas of RF-X the camera shakes A LOT and I just want to be able to see the best while I'm exploring. So if anyone has thoughts on this I'd sure like to hear them. Thanks!
technoid
Well-known member
I searched the forum for camera shake and found a post from Ryan Douglas explaining what it is and that you can't fix it. Here's a copy of the post and a link to it.
The problem described by the OP--jitter that increases with distance from the airport center--is a result of limitations with floating point precision (under the hood programming and math stuff). The general problem is not limited to RealFlight, though the specific ways in which it manifests as undesirable behavior are.
It is endemic to the system. During "normal" use, though, it will not rear its head.
https://forums.realflight.com/showpost.php?p=263322&postcount=39
legoman
Well-known member
Got a question for you guys. I want to get rid of the camera shake completely, that may not be realistic but for this plane that's what I want to do. I've played around with the shock mount for the camera but the camera still shakes. In some areas of RF-X the camera shakes A LOT and I just want to be able to see the best while I'm exploring. So if anyone has thoughts on this I'd sure like to hear them. Thanks!
The camera usually shakes more when it is farther away from the spawn point. no real way to fix it either.
technoid
Well-known member
The camera usually shakes more when it is farther away from the spawn point. no real way to fix it either.
That's what they said in the thread I read where Ryan posted explaining what it was. And that's what I see, the further I fly the worse it gets. Oh well I just have to live with it. A 64 bit float should fix that but not possible in the engine they use I guess. Or they just don't want to use it for rending speed.