
You are using an out of date browser. It may not display this or other websites correctly.
You should upgrade or use an alternative browser.
You should upgrade or use an alternative browser.
Extra NG
- Thread starter abaser
- Start date
abaser
Well-known member
Yeah, that’s my next step. I tried on my own but sometimes that just doesn’t work out.I'm not sure it's possible to give advice on how to do that in post form. I could link some videos but I'm sure you've done that by now.
Boof69
Well-known member
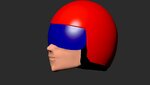
I would start with a sphere that I would stretch starting from the top of the visor. pull that down to to the full height of the helmet. Then draw in edges to form the lower outline of the helmet an goggles. Delete the unused polys then "Shell" to create a thickness. Delete the inner polys but keep the ones that make that thickness. Then grab all the edges that would make the upper border of the face and pull down several times to make an appropriate amount of edgeloops for the face detail. End that at the jaw line then close them under the jaw. Shape the open border to form the neck and pull down to form a neck. Go back to the face area and draw on edgeloops to form a nose shape and extrude out a nose and then form the rest of the details to make the face. Then make the jacket as a separate object which should be the easier part at this point. I hope this helps.
technoid
Well-known member
Yeah me too. I've never tried to make a pilot but expect the same results if I do. But I might for the SS.Anybody got any tips on making this guy? My first attempt didn’t go so well. Planes I can do, people, not so much. ?
abaser
Well-known member
I’ll give that a shot.I would start with a sphere that I would stretch starting from the top of the visor. pull that down to to the full height of the helmet. Then draw in edges to form the lower outline of the helmet an goggles. Delete the unused polys then "Shell" to create a thickness. Delete the inner polys but keep the ones that make that thickness. Then grab all the edges that would make the upper border of the face and pull down several times to make an appropriate amount of edgeloops for the face detail. End that at the jaw line then close them under the jaw. Shape the open border to form the neck and pull down to form a neck. Go back to the face area and draw on edgeloops to form a nose shape and extrude out a nose and then form the rest of the details to make the face. Then make the jacket as a separate object which should be the easier part at this point. I hope this helps.
abaser
Well-known member
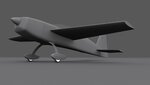
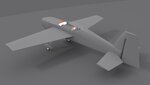
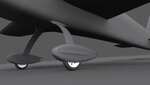
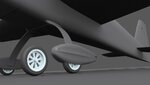
Some of tonight's progress. Created the main gear, wheels, wheel pants, vertical stab, and rudder. Wheels and wheel pants kind of cost me in the poly count, but I feel they're well worth the cost.
Attachments

uncle twist
Well-known member
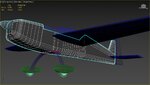
WOW Andy..!!!,..I woke up early this morning, and saw this, very nice to wake up too with my morning cup O` Joe. Your main gear struts with the fairing at the fuse, wheel pants, and wheels looking nothing less than amazing. I also love both wire frame pics., the fourth one is really nice with separately colored parts of the plane, making all the different components that make up the plane as a whole stand out in detail, the same applies to pic. 5 & 6. your close up of the wheels look amazing...!!!! Fantastic job...!!!! ") ??
??
??abaser
Well-known member
Thanks guys. Yes Scott, occasionally. Everything you see though, with the exception of the instrument panel, are baked materialsWhat can I say that UT didn't. Ditto andy looks great. I see you are mapping as you go.
abaser
Well-known member
Thanks Scott. Man, when I took on the task of doing a pilot, I never dreamed it would take as much as it has. It’s definitely way different than anything I’ve done before.Wow Andy that is really great. It is way outside what modeling a plane is and you've done a great job of it.
Boof69
Well-known member
So you start with a single poly. I start at the tip of the nose. One edge is at X axis 0 then I put on symmetry and from the profile view of a reference photo and the top edge of that poly selected I hold shift and move repeatedly to follow the silhouette of the reference. When that is finished you will have a center line and you can continue to grab edges and shift move them to shape the face. That's over simplified but I think you get the point.
abaser
Well-known member
Hmm.... I’ll have to give that a try. I also saw something in one of the tutorials I watched, but it was never explained how she did it. She just stated let’s add an edge loop and when she crossed an edge with the cursor it highlighted a possible edge loop to be placed. It basically cut out the step of selecting all edges to connect, then connecting them. Just touch an edge and click. Instant edge loop.So you start with a single poly. I start at the tip of the nose. One edge is at X axis 0 then I put on symmetry and from the profile view of a reference photo and the top edge of that poly selected I hold shift and move repeatedly to follow the silhouette of the reference. When that is finished you will have a center line and you can continue to grab edges and shift move them to shape the face. That's over simplified but I think you get the point.
uncle twist
Well-known member
That guy is looking great at this point Andy, especially since you haven`t done one before. I can`t even imagine how hard it`s got to do,.. with all the compound curves, OH WAIT..!!! The valve covers on my PZL had compound curves @ the very front,top of them, Man, were they ever a PITA, So I understand a little of what you`re experiencing.